If you’re planning to install Varnish, you have quite a number of options as to how you’re going to do that.
The first decision you’ll have to make is which version of Varnish:
After that, you’ll have to select the platform where Varnish is going to run:
If you’re planning to install Varnish on on-premise infrastructure, you’ll also need to decide what operating system to use.
Let’s break this down into individual parts.
Although you are free to compile Varnish from source, it’s safe to use the following quote:
Ain’t nobody got time for that.
There are Varnish packages available for the following Linux distributions:
It’s a matter of running apt-get install varnish or
yum install varnish depending on the package manager that your
distribution supports.
The preferred way to go is by installing Varnish’s official packages, which are maintained by Varnish Software.
You can find them at https://packagecloud.io/varnishcache. There are packages for stable versions of Varnish, and for fresh releases of Varnish that happen twice per year. There are even packages for end-of-life versions of Varnish.
My advice is to install the 6.0 LTS packages because they are the most stable. You can find them at https://packagecloud.io/varnishcache/varnish60lts.
The following Linux distribution versions are supported:
Loading the right repository is quite easy. For Debian and Ubuntu systems, you can run the following script:
$ curl -s https://packagecloud.io/install/repositories/varnishcache/varnish60lts/script.deb.sh | sudo bash
For Red Hat, CentOS, and Fedora systems, the following script can be used:
$ curl -s https://packagecloud.io/install/repositories/varnishcache/varnish60lts/script.rpm.sh | sudo bash
Both scripts will identify your Linux distribution, register the repository endpoints, verify the GPG key, and update the channels.
And in the end, it’s a matter of running apt-get install varnish or
yum install varnish.
We would advise you to install the latest version, but if you’re interested in which versions are available, you can install a specific version.
On Debian and Ubuntu, you can run apt-cache policy varnish to see
the available versions:
$ apt-cache policy varnish
varnish:
  Installed: (none)
  Candidate: 6.0.8-1~bionic
  Version table:
	 6.0.8-1~bionic 500
		500 https://packagecloud.io/varnishcache/varnish60lts/ubuntu bionic/main amd64 Packages
	 6.0.7-1~bionic 500
		500 https://packagecloud.io/varnishcache/varnish60lts/ubuntu bionic/main amd64 Packages
	 6.0.6-1~bionic 500
		500 https://packagecloud.io/varnishcache/varnish60lts/ubuntu bionic/main amd64 Packages
On Red Hat, CentOS, an Fedora, you can run
yum --showduplicates list varnish to see the available versions:
$ yum --showduplicates list varnish
Available Packages
varnish.x86_64 6.0.6-1.el7 varnishcache_varnish60lts
varnish.x86_64 6.0.7-1.el7 varnishcache_varnish60lts
varnish.x86_64 6.0.8-1.el7 varnishcache_varnish60lts
Because reverse compatibility is ensured, it doesn’t make much sense to install an older version. However, we’ve shared this information just so you know that these older versions exist.
Varnish Enterprise packages are installed via https://packagecloud.io/varnishplus, but you need a key to access this repository. These keys come with your Varnish Enterprise license.
Once the package channel has been registered on your system, you can run
apt-cache policy varnish-plus or
yum --showduplicates list varnish-plus to figure out which versions
are available.
Here’s the output for Debian and Ubuntu:
$ apt-cache policy varnish-plus
varnish-plus:
  Installed: (none)
  Candidate: 6.0.8r1-1~bionic
  Version table:
	 6.0.8r1-1~bionic 500
		500 https://packagecloud.io/varnishplus/60/ubuntu bionic/main amd64 Packages
	 6.0.7r3-1~bionic 500
		500 https://packagecloud.io/varnishplus/60/ubuntu bionic/main amd64 Packages
	 6.0.7r2-1~bionic 500
		500 https://packagecloud.io/varnishplus/60/ubuntu bionic/main amd64 Packages
...
Here’s the output for CentOS, Red Hat, and Fedora:
$ yum --showduplicates list varnish-plus
...
varnish-plus.x86_64 6.0.7r2-1.el7 varnish-plus-60
varnish-plus.x86_64 6.0.7r3-1.el7 varnish-plus-60
varnish-plus.x86_64 6.0.8r1-1.el7 varnish-plus-60
A quick disclaimer about the listing of available packages: we have shortened the list so we don’t fill pages with somewhat irrelevant content. Keep in mind that a lot of versions are available.
Then it’s just a matter of executing apt-get install varnish-plus or
yum install varnish-plus to install Varnish Enterprise.
There are also some other packages you might want to install when running Varnish Enterprise:
varnish-plus-vmods-extras: a collection of enterprise VMODs that
require external dependencies. They are kept separate to keep the
initial footprint of Varnish Enterprise small.varnish-broadcaster: the Varnish Broadcaster is primarily used to
perform distributed cache invalidations and for Varnish High
Availability.varnish-plus-discovery: an autodiscovery tool that automatically
provisions the broadcaster’s nodes.conf filevarnish-plus-ha: the High Availability component of Varnish
Enterprisevarnish-custom-statistics: the Varnish Custom Statistics (VCS)
server that stores custom time-series data that was logged in VCLvarnish-custom-statistics-agent: the agent software that sends
custom statistics from the VSL to the VCS servervarnish-plus-addon-ssl: contains Hitch, the TLS proxy that is used
to support TLS/SSL in VarnishDepending on your setup, you’re not going to install all these packages on a single server. Especially the VCS server, which can be installed on a separate machine.
Various Linux distributions offer packages for Varnish Cache. The versions vary a lot, there’s no flexibility, and only recent versions of Debian, Ubuntu, and CentOS/Red Hat/Fedora offer packages for Varnish Cache 6.
Here’s an overview of the distributions and versions that support Varnish Cache 6 at the time of writing:
epel-releaseIf you’re planning to install Varnish on CentOS, Red Hat, or Fedora, you must install
epel-release, which is done viayum install -y epel-release.
For the operating systems mentioned above, it’s just a matter of running
apt-get install varnish or yum install varnish to install Varnish.
We discourage you from installing these packages, as they aren’t updated. You will probably get some security fixes when there’s a vulnerability, but regular bugfixes and new features are only available if you use our official packages.
Deploying Varnish in the cloud is an easy way to get a full-blown Varnish setup without having to install and configure the software yourself.
Most public cloud vendors have a marketplace where machine images are advertised. Varnish Software is also on these marketplaces and offers official machine images.
These images are available on the following cloud platforms:
Information on the various images on AWS is available at https://aws.amazon.com/marketplace/seller-profile?id=263c0208-6a3a-435d-8728-fa2514202fd0.
Images that are worth mentioning:
When spinning up virtual machines that use this image, you’ll end up with a fully functional Varnish server that was automatically set up and configured and only needs your VCL.
A small management fee is charged by the hour, and is separately billed by AWS on top of the infrastructure cost. This fee also includes the license of Varnish Enterprise. This is great because you can actually start using Varnish Enterprise without an upfront license cost. However, you don’t get a Service Level Agreement and the same level of support.
The image below shows how you can select our images from the AWS Marketplace:
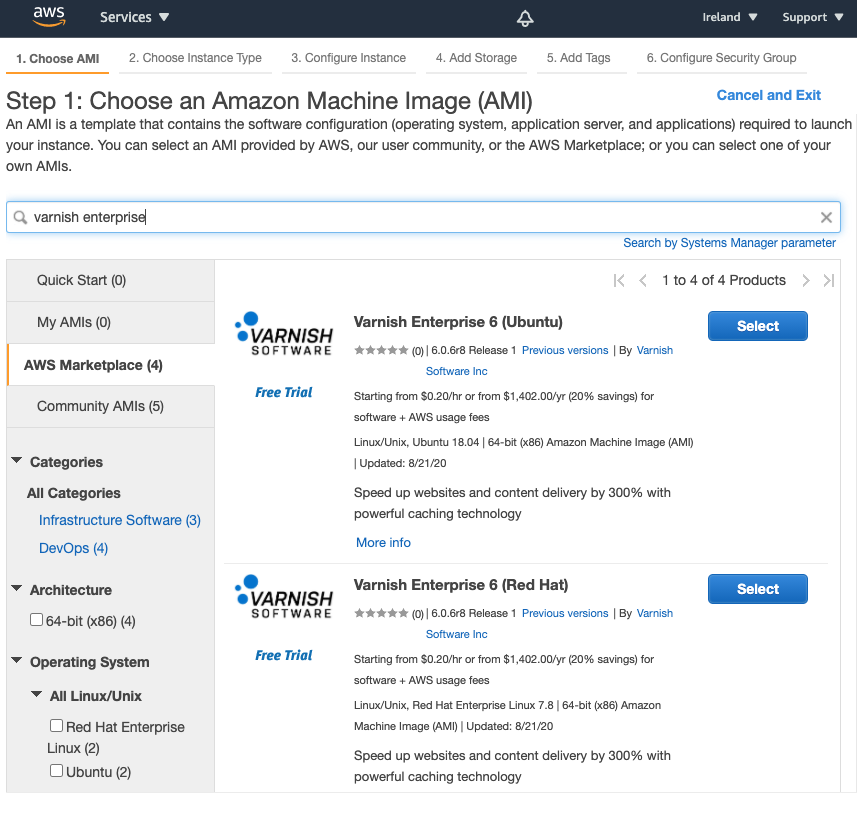
When you spin up a new EC2 instance, the Quick Start option is selected in step 1. If you click AWS Marketplace and search for Varnish Enterprise, you’ll find some related images that you can spin up.
When the server is up-and-running, and you access it via HTTP, you’ll get a welcome page that directs you to https://info.varnish-software.com/cloud/new-instance for further instructions.
Varnish Enterprise images are also available on the Microsoft Azure Marketplace at https://azuremarketplace.microsoft.com/en-us/marketplace/apps/varnish.varnish-cache_.
The same licensing deal applies on Azure: Microsoft will send you a bill for the infrastructure cost and will bill you separately for the licensing. This will also allow you to use Varnish Enterprise without an upfront license cost.
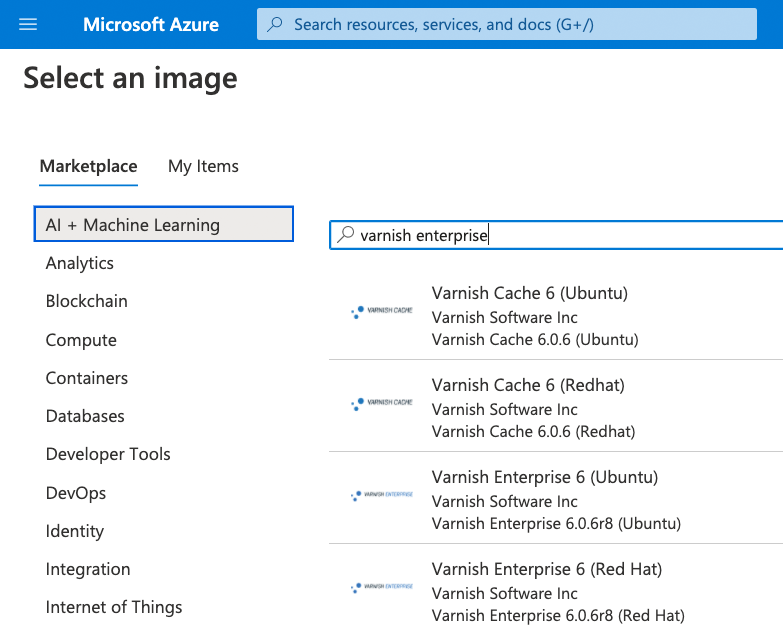
In a similar fashion, when spinning up a virtual machine on Azure and selecting the machine image, you click Browse all public and private images.
The image below shows what this image browser looks like. When you search for Varnish Enterprise, this is the result you get:
 height=“5.293918416447944in”}
Once the machine is up-and-running, and you access it via HTTP, you’ll also be directed to https://info.varnish-software.com/cloud/new-instance for further instructions.
Google Cloud Platform (GCP) also has a marketplace and also features our official machine images. You’ll find them at https://console.cloud.google.com/marketplace/browse?q=varnish%20software%20inc..
In terms of cost and payment, it’s the same deal as for AWS and Azure: Google charges you for the infrastructure and bills you separately for the licensing.
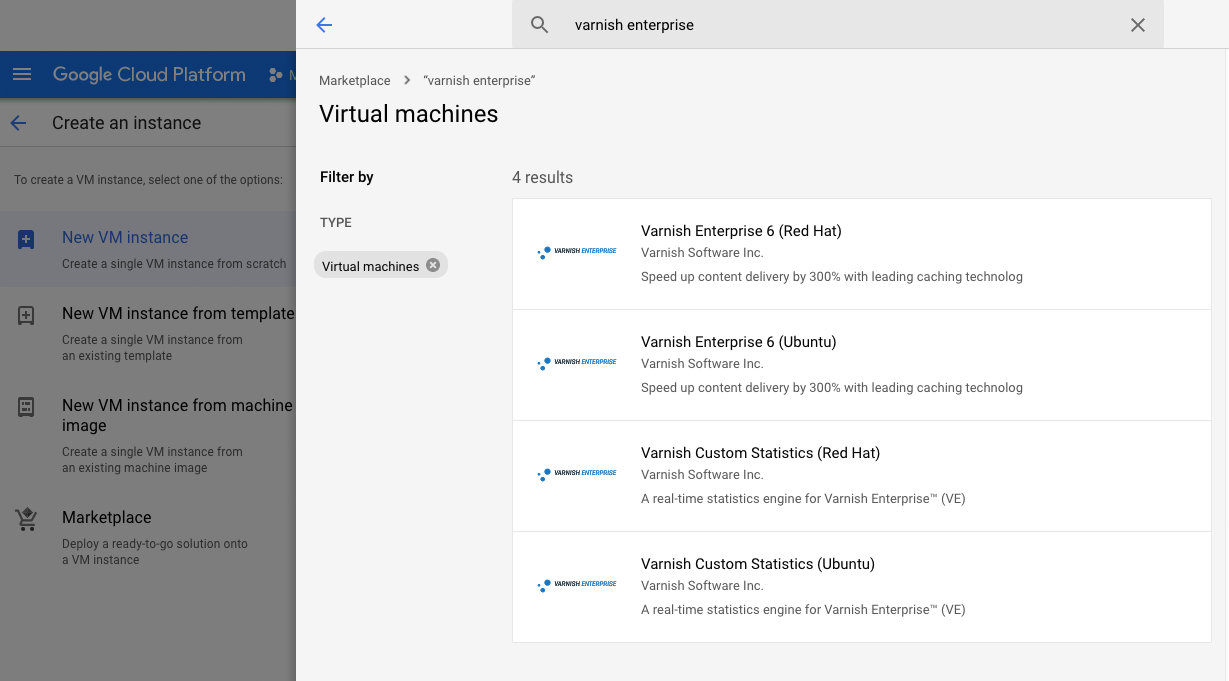
When you’re launching a new virtual machine, and you want to use one of our images on GCP, you’ll be given the option to create a New VM instance. Please click Marketplace instead. When you search for Varnish Enterprise, this is what you get:
And again, once the machine is up-and-running, and you access it via HTTP, you’ll also be directed to https://info.varnish-software.com/cloud/new-instance for further instructions.
Oracle Cloud Infrastructure is a different animal. In terms of licensing they apply a Bring Your Own License (BYOL) policy. And on OCI we only support Varnish Enterprise on a custom Oracle Linux distribution.
More information is available at https://cloudmarketplace.oracle.com/marketplace/en_US/listing/73388855.
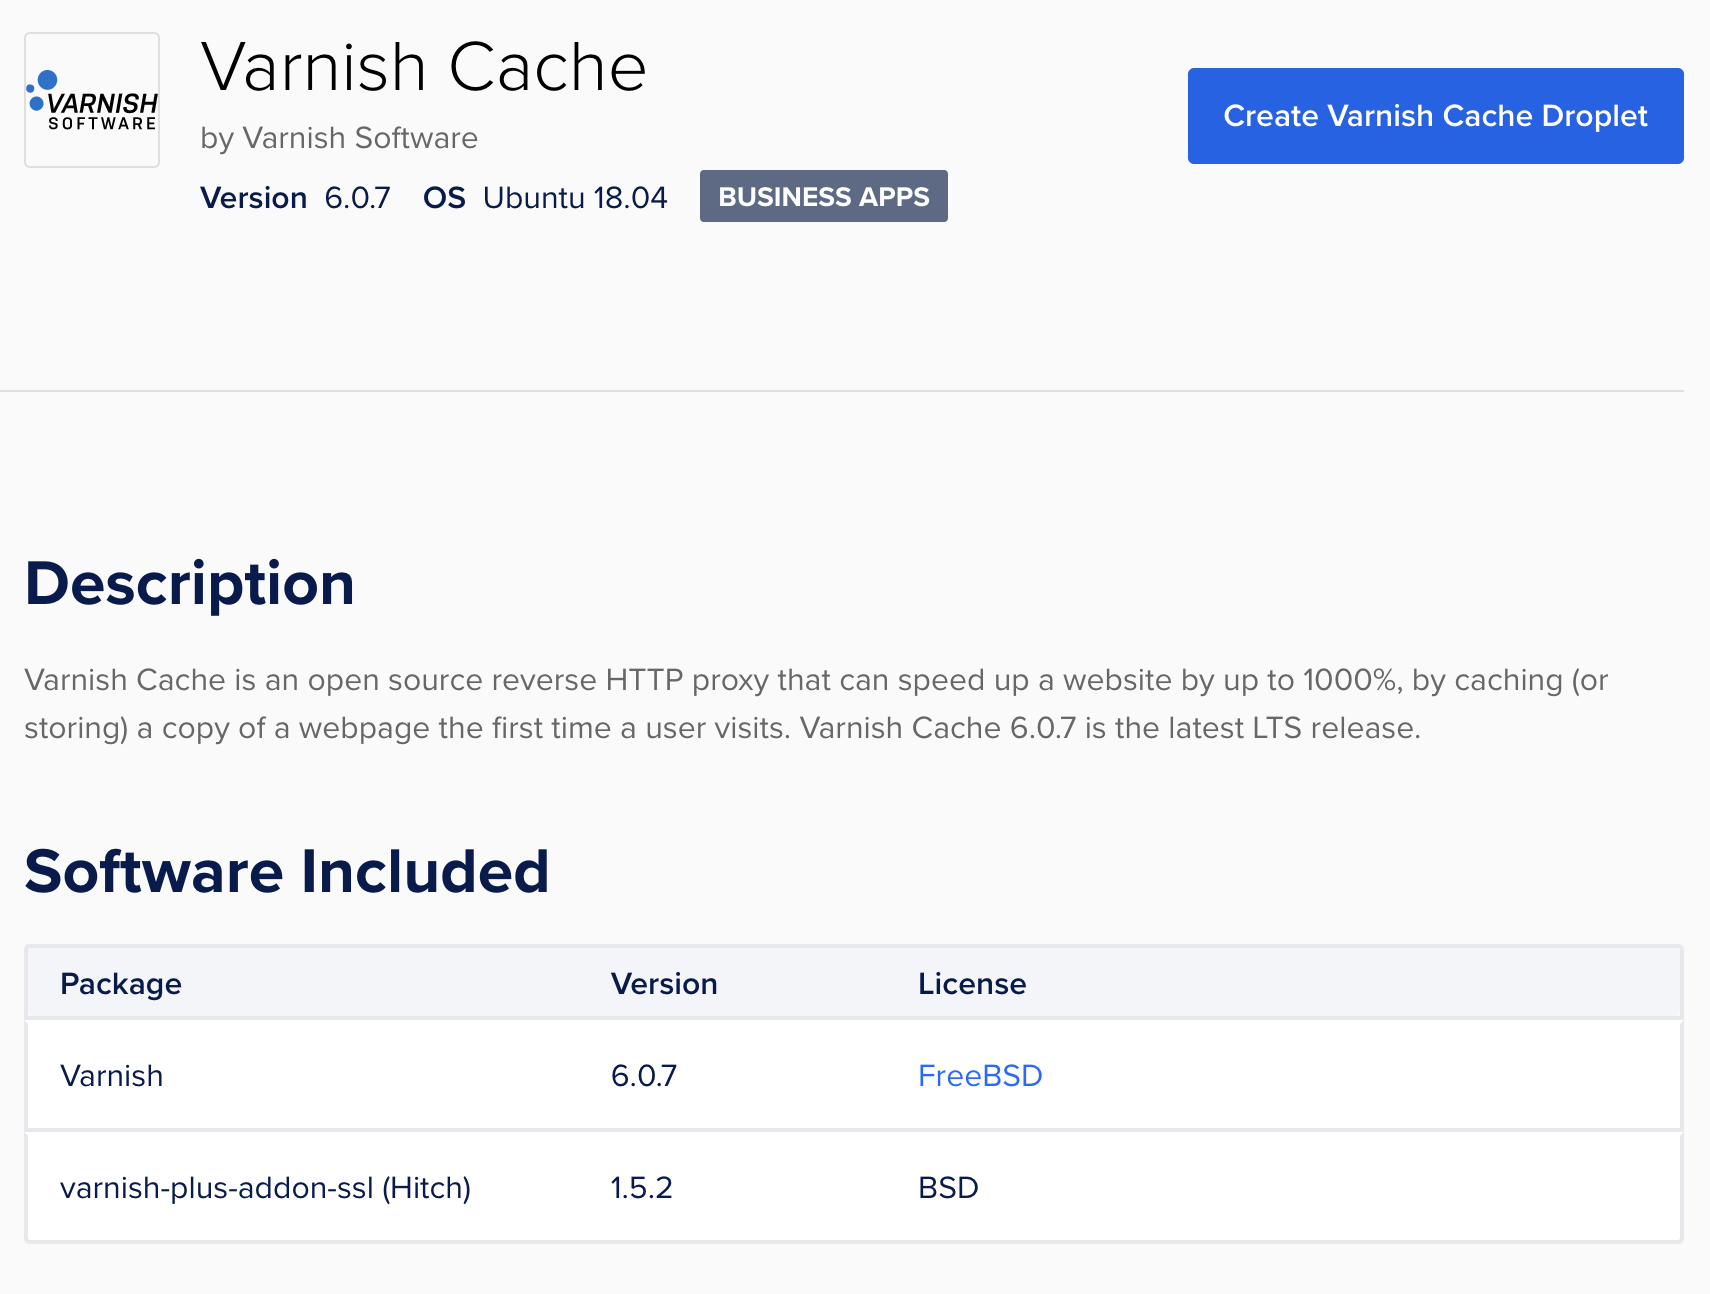
We offer an official DigitalOcean droplet for Varnish Cache on their marketplace. See https://marketplace.digitalocean.com/apps/varnish-cache for more information.
Because this is an open source image, no license fees are charged. The
benefit of using the droplet, compared to installing Varnish Cache
yourself, is that the droplet features Varnish Cache 6.0 LTS. This is
the long-term support version that is maintained by Varnish
Software. At the time of writing, this is version 6.0.8.
Varnish is also available for Docker, and there is an official Varnish Cache Docker image, which is available on the Docker Hub at https://hub.docker.com/_/varnish.
We support two kinds of images for Varnish Cache:
Unless you need fresh features, I’d advise you to use stable
releases. Here’s how you would run the official image using the
docker run command:
$ docker run --name varnish -v /path/to/varnish/default.vcl:/etc/varnish/default.vcl:ro --tmpfs /var/lib/varnish:exec -p 80:8080 -d varnish:stable
This command does the following:
varnish/path/to/varnish/default.vcl on your host system onto
/etc/varnish/default.vcl in the container as a read-only file/var/lib/varnish directory of the container in tmpfs,
which means the contents will be stored in memory, and only exec
calls are allowed80 on the container to port 8080 on the
host system-d parametervarnish:stable image, which is the stable tag that
currently refers to Varnish Cache 6.0.6 LTSAnd in the end you can access Varnish by calling
http://localhost:8080 in your browser.
There is also an official Docker image for Varnish Enterprise, but this image is not public, and only accessible to users who have a Varnish Enterprise license key.
These Docker containers can be run standalone, but they can also be
orchestrated with docker-compose, Kubernetes, or other
cloud-native orchestration software.
If you want to run Varnish in Kubernetes, you can use our official Docker. Unfortunately, at the time of writing there is no official Varnish Helm chart.
However, for your convenience, we have created a Kubernetes configuration.
The first part of the Kubernetes configuration we’ll create is the config map. We use it to store our VCL configuration.
Here’s the ConfigMap definition:
apiVersion: v1
kind: ConfigMap
metadata:
  name: varnish
  labels:
	name: varnish
data:
  default.vcl: |+
	vcl 4.1;
	backend default none;

	sub vcl_recv {
		if (req.url == "/varnish-ping") {
			return(synth(200));
		}

		if (req.url == "/varnish-ready") {
			return(synth(200));
		}

		return(synth(200,"Welcome"));
	}
The name of this ConfigMap is varnish and the name label is also
varnish. Inside the config map we store a key named default.vcl
which contains the VCL file. You’ll notice we used an oversimplified
VCL config to limit the size of the configuration.
The next thing we need is a service definition. It allows the Kubernetes pods to be exposed to the outside world.
apiVersion: v1
kind: Service
metadata:
  name: varnish
  labels:
    name: varnish
spec:
  type: ClusterIP
  ports:
    - port: 80
      targetPort: 80
      protocol: TCP
      name: varnish-http
  selector:
    name: varnish
In terms of naming and labeling, we stuck with varnish. This service
will bind itself to port 80 on the IP address of the Kubernetes
cluster.
The deployment is the part of the configuration that refers to the containers. In Kubernetes containers are run in pods. Containers inside these pods share the network.
Here’s our simplified deployment configuration:
apiVersion: apps/v1
kind: Deployment
metadata:
  name: varnish
  labels:
	name: varnish
spec:
  replicas: 1
  selector:
	matchLabels:
	  name: varnish
  template:
	metadata:
	  labels:
		name: varnish
	spec:
	  containers:
		- name: varnish
		  image: "varnish:stable"
		  imagePullPolicy: IfNotPresent
		  ports:
			- name: http
			  containerPort: 80
			  protocol: TCP
		  livenessProbe:
			httpGet:
			  path: /varnish-ping
			  port: 80
			initialDelaySeconds: 30
			periodSeconds: 5
		  readinessProbe:
			httpGet:
			  path: /varnish-ready
			  port: 80
			initialDelaySeconds: 30
			periodSeconds: 5
		  volumeMounts:
		  - name: varnish
			mountPath: /etc/varnish
	  volumes:
	  - name: varnish
		configMap:
		  name: varnish
For naming and labeling we stick with varnish. Labels are referred to
by selectors in other resource types. In the service definition, the
selector referred to a pod that had the name: varnish label.
That way we can link services to pods. The pod we’re creating in our
deployment has a Varnish container named varnish that uses the
varnish:stable Docker image. This is our official image.
Port 80 is exposed and used by the service through the service’s
targetPort:80 configuration.
The deployment also refers to a liveness probe and a readiness probe. These URL endpoints are monitored by Kubernetes.
The livenessProbe configuration is used to check whether the container
is still alive. If the endpoint doesn’t respond, the container is
restarted. The readinessProbe configuration is used to decide whether
or not the container can accept traffic.
You may have noticed that these probing endpoints were defined in the VCL file. As long as they return the synthetic HTTP 200 response, all is good.
There’s also a volume definition. It creates a volume named varnish
that refers to the config map we created. This way, we can mount the
config map as a disk inside the container. Via the volumeMounts
configuration in the container definition, we can mount the config map
to the /etc/varnish folder. This results in /etc/varnish/default.vcl
being available.
Assuming that the ConfigMap definition, the Service definition, and
the Deployment definition are all stored in separate YAML files in
the same folder, the following command can be used to deploy them to
Kubernetes:
$ kubectl apply -f .
configmap/varnish created
deployment.apps/varnish created
service/varnish created
The kubectl get all is one of those commands that can be run to figure
out the status of the resources we just created:
$ kubectl get all
NAME                          READY   STATUS    RESTARTS   AGE
pod/varnish-dbc8dbc9c-zfc8t   1/1     Running   0          84s

NAME                 TYPE        CLUSTER-IP     EXTERNAL-IP   PORT(S)   AGE
service/varnish      ClusterIP   10.96.39.230   <none>        80/TCP    84s

NAME                      READY   UP-TO-DATE   AVAILABLE   AGE
deployment.apps/varnish   1/1     1            1           84s

NAME                                DESIRED   CURRENT   READY   AGE
replicaset.apps/varnish-dbc8dbc9c   1         1         1       84s
The service is bound to port 80 on IP address 10.96.39.230 of your
cluster.
If you’re running Kubernetes on your local machine, you can use
kubectl port-forward to forward the port of a service to a local port
on your computer:
$ kubectl port-forward service/varnish 8080:80
Forwarding from 127.0.0.1:8080 -> 80
Forwarding from [::1]:8080 -> 80
And in the end, we can access our service via http://localhost:8080
and receive our synthetic output:
$ curl http://localhost:8080
<!DOCTYPE html>
<html>
  <head>
	<title>200 Welcome</title>
  </head>
  <body>
	<h1>Error 200 Welcome</h1>
	<p>Welcome</p>
	<h3>Guru Meditation:</h3>
	<p>XID: 2</p>
	<hr>
	<p>Varnish cache server</p>
  </body>
</html>
If you want to clean up after yourself, just run kubectl delete -f .
to delete the created resources from your Kubernetes server.
An important disclaimer is that this example is not necessarily an accurate representation of what is required to run Varnish inside Kubernetes in a production environment. When it comes to backend selection, logging, persistent storage, high availability and autoscaling, there is a lot more to be done.
But that, ladies and gentlemen, is beyond the scope of this book.