Historically, Varnish didn’t support TLS/SSL.
The primary focus has always been performance, and back when Varnish was coming up, the use of SSL and TLS wasn’t as prevalent as it is now.
With performance in mind, there was always a fear that the implementation of a crypto layer would jeopardize performance.
There was also the UNIX philosophy lingering in the back of the minds of Varnish’s creators:
Do one thing well.
The one thing Varnish does well is caching. And if TLS/SSL is so important, should it be part of Varnish, or should it be implemented in another layer of your web platform?
At some point, Varnish went for the latter, but decided to facilitate TLS termination by supporting the PROXY protocol.
This way Varnish could still focus on its core duty, which is caching, but the threshold for TLS termination could be lowered thanks to the PROXY protocol.
At this point, the PROXY protocol should sound familiar. We’ve covered
it a number of times throughout the book. You should also know that
varnishd can listen for incoming connections over PROXY. And thanks
to vmod_proxy, you can extract proxy-protocol-v2 TLV attributes from
the TCP connection.
Lowering the barrier for TLS termination was the ambition at first, but in 2015 Varnish Software decided to contribute to this by developing an open source TLS proxy.
In the vein of the UNIX philosophy, the goal was to create a lightweight TLS proxy that was built for the job, but that would also play nice with Varnish.
The project was named Hitch, and unsurprisingly the one thing it does well is TLS.
Hitch is a separate program that you run in front of your Varnish server, as illustrated in the diagram below:
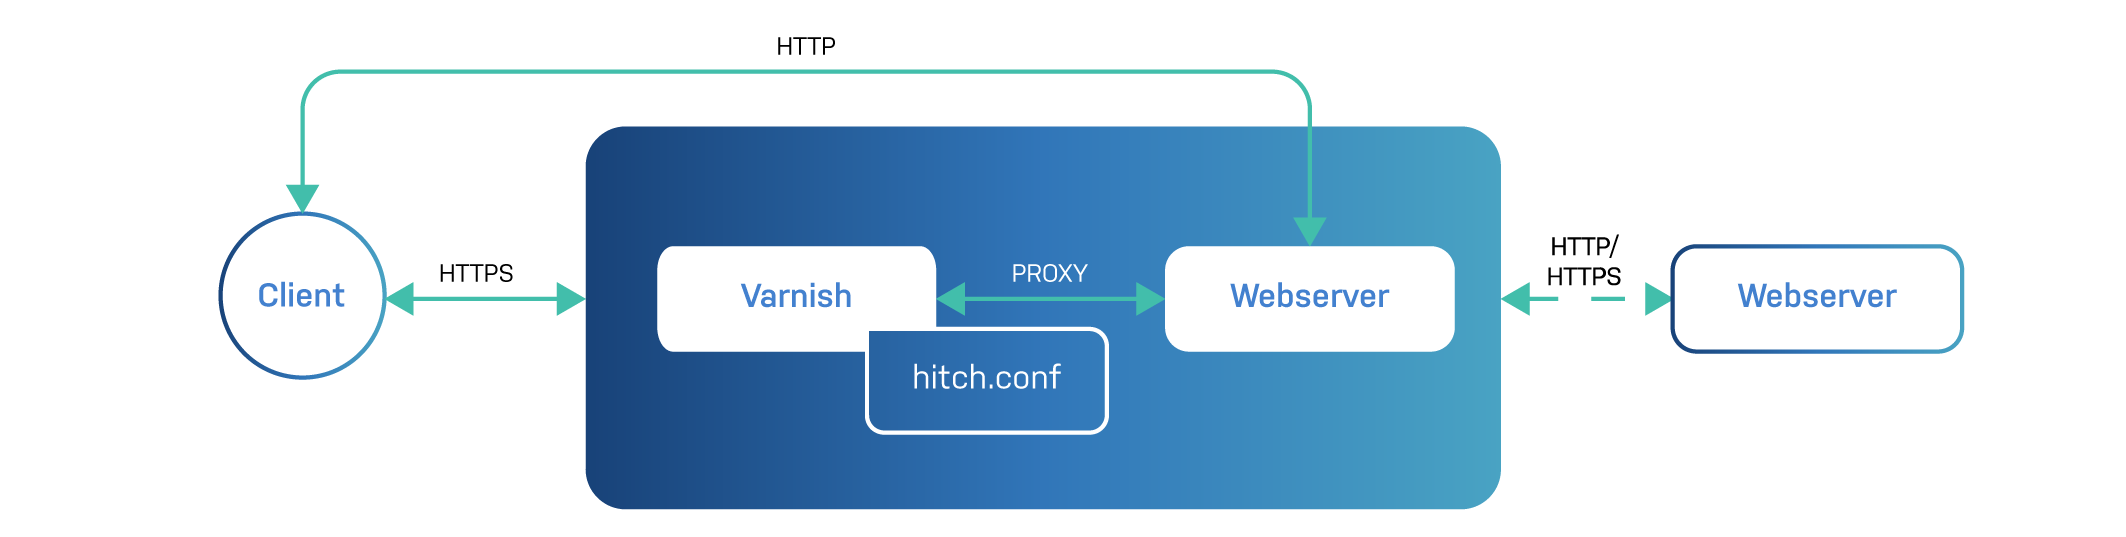
What you also see is that Hitch and Varnish are often installed on the same server. They communicate with each other over the PROXY protocol. This can be done over regular TCP/IP, but a UNIX domain socket (UDS) connection can also be made to further reduce latency.
Although Varnish did lower the barrier for TLS termination, there was always a risk that adding an extra hop in the form of a third-party TLS proxy could have an impact on performance and latency.
By introducing Hitch as a component in the reference architecture of Varnish, we could meet guarantees of performance, scalability, and low latency. The throughput rate of 100 Gbps on a single server is proof of that.
Hitch was specifically designed to terminate TLS connections for Varnish, but it does not exclusively work with Varnish. It is not even restricted to HTTP traffic.
Any service that communicates over TCP/IP and that requires TLS can be terminated using Hitch.
The project’s website can be found at https://hitch-tls.org/, but the code itself is hosted on https://github.com/varnish/hitch.
You are free to compile Hitch from source; there’s no denying that packages are a lot more convenient. Up until recently, you had to rely on distro packages, which are often outdated.
More recently, we decided to provide official packages for Hitch at https://packagecloud.io/varnishcache/hitch. This happens to be the same place where official Varnish Cache packages can be found. This makes installing these packages look familiar.
For Debian and Ubuntu systems, you can run the following script:
$ curl -s https://packagecloud.io/install/repositories/varnishcache/hitch/script.deb.sh | sudo bash
For Red Hat, CentOS, and Fedora systems, the following script can be used:
$ curl -s https://packagecloud.io/install/repositories/varnishcache/hitch/script.rpm.sh | sudo bash
And in the end you either run apt-get install hitch, or
yum install hitch, depending on your Linux distribution.
After installing Hitch, you can customize its behavior by modifying
/etc/hitch/hitch.conf. In order to activate these changes, you have to
reload the hitch process via systemd:
$ sudo edit /etc/hitch/hitch.conf
$ sudo systemctl reload hitch
You’re not solely reliant on /etc/hitch/hitch.conf. The hitch
program also has a number of command line parameters that can be used to
extend the default behavior or to override settings that were defined in
hitch.conf.
But even when using a configuration file, hitch will need to know
where to find it, so you’ll use the --config parameter to indicate
that:
hitch --config=FILE
But let’s talk about Hitch configurations. We’ve categorized some interesting ones into five groups, which represent the five next subsections.
Hitch is a proxy server, just like Varnish. This means we need to configure how it accepts connections, and how it proxies them through to Varnish.
The listening address is configured using a frontend block. As you
can see in the example below, accepting connections on all interfaces on
port 443 is the most common use case:
frontend = {
	host = "*"
	port = "443"
}
You can have multiple frontend blocks in a single configuration file, and these frontend blocks can hold additional settings.
Here’s an example where we have two frontends, each with their own certificates:
frontend = {
	host = "1.2.3.4"
	port = "443"
	pem-file = "/etc/hitch/example.com.pem"
}

frontend = {
	host = "5.6.7.8"
	port = "443"
	pem-file = "/etc/hitch/foo.com.pem"
}
Just so you know, this is just a hypothetical example. You don’t really need to define multiple frontends to host multiple certificates. SNI will make sure you can serve multiple certificates on the same endpoint by inspecting the Subject Alternative Name of the certificate.
The frontend can also be defined as an one-liner, as illustrated
below:
frontend = "[*]:444"
And it is also possible to attach a certificate to the frontend:
frontend = "[*]:444+/etc/hitch/cert.pem"
We still need to talk about backend connections. The backend
configuration can be used to define where Hitch is going to proxy its
traffic to.
Here’s an example where we connect to Varnish over TCP/IP:
backend = "[127.0.0.1]:8443"
But we can also connect using a UDS:
backend = "/var/run/varnish.sock"
And before we talk about the next subject, I’d like to show you an
example where frontend and backend configurations are done via
command line arguments and not via the configuration file:
$ sudo hitch -u hitch -f "[*]:443+/etc/hitch/cert.pem" -b "[127.0.0.1]:80"

> The `-u` parameter defines which user should be used to run `hitch`.
> The `root` user is not allowed.
When the backend directive or command line argument refers to a
hostname, this hostname is resolved to the corresponding IP address upon
startup. By default this happens only once. When the hostname is
changed, and resolves to another IP address, Hitch does not notice
this, and keeps on sending data to the IP address it resolved upon
startup.
Hitch has a backend-refresh setting that allows you to define the
frequency of the backend DNS resolution. The default value is zero,
meaning no backend refresh takes place.
The following example will allow backend DNS refreshes to happen every 30 seconds:
backend-refresh = 30
And this is the command line equivalent:
$ sudo hitch -u hitch -f "[*]:443+/etc/hitch/cert.pem" -b "[backend.example.com]:80" -R 30
The
-Roption is the shorthand for--backend-refresh, which is also supported.
We just showed you that you can bind certificates to frontend listening addresses. But in most cases, it makes more sense to define the certificate location with a global scope.
The pem-file directive can be added to your Hitch configuration file
outside of the frontend data structure:
pem-file = "/etc/hitch/example.com.pem"
The PEM file refers to a x509 certificate file. It is a concatenation of the private key, the main certificate, and the corresponding certificate chain.
The pem-file directive can be used multiple times to load multiple
certificates. Server Name Indication (SNI) will make sure the right
certificate is loaded based on Subject Alternative Name of the
certificate.
However pem-file is more than a one-liner, it is a data structure of
its own. It allows you to split up the certificate from the private key.
Here’s an example of a pem-file definition with a separate private key
file:
pem-file = {
	cert = "/etc/hitch/example.com.pem"
	private-key = "/etc/hitch/private.key"
}
This data structure can also be defined multiple times. SNI will again make sure the right certificate is matched.
If you have a bunch of certificate files that happen to change
occasionally, there is a more flexible way to define them, which is by
using the pem-dir directive.
Its value is a directory where certificates are stored. Here’s an example:
pem-dir = "/etc/hitch/cert.d"
Hitch will iterate through that directory and load the certificate information from every file.
It does make sense to define a fallback pem-file directive in your
configuration, in case you are dealing with clients that do not support
SNI. If you do not define a fallback, the first match of the iteration
of the pem-dir will be used. If you set sni-nomatch-abort = off, the
connection will abort if SNI didn’t find a matching certificate.
There is also a pem-dir-glob directive that allows you to be more
selective when using pem-dir to load certificates from a directory. A
glob pattern can be applied while iterating through the directory.
When you combine them, you end up with the following configuration:
pem-dir = "/etc/hitch/cert.d"
pem-dir-glob = "*.pem"
This example will load all certificates from the /etc/hitch/cert.d
folder that match the *.pem pattern. A certificate like
/etc/hitch/cert.d/example.com.pem would be matched, whereas
/etc/hitch/cert.d/example.com.cert wouldn’t.
Loading certificates is also possible through command line arguments. We’ve already seen an example where a certificate was bound to a frontend. Let’s look at an example where a certificate is defined at the global scope:
$ sudo hitch -u hitch -f "[*]:443" -b "[127.0.0.1]:80" /etc/hitch/cert.pem
When it comes to protocols, there are three questions to be asked:
Let’s start off by saying that SSL is dead. For the sake of clarity, we talk about TLS/SSL, but in reality we’re no longer using the SSL protocol. It’s all TLS.
The tls-protos directive allows us to set the TLS protocols that
Hitch is willing to support. And although it is technically possible
to mention SSLv3 as a potential protocol, the best way to configure
this directive nowadays is as follows:
tls-protos = TLSv1.2 TLSv1.3
The support protocol versions also depend on what the OpenSSL version on your server supports. For
TLSv1.3, OpenSSL version 1.1.1 is the minimum requirement.
The --tls-protos command line option can be used to override whatever
is stored in your configuration file. Here’s an example of how to define
the TLS protocols via the command line:
$ sudo hitch -u hitch \
		   -f "[*]:443" -b "[127.0.0.1]:80" \
		   --tls-protos="TLSv1.3" /etc/hitch/cert.pem
When we talk about proxying requests to the backend, we’ve been consistently talking about HTTP. That is not the case in Hitch because it has no awareness of HTTP.
What we can do is enable the PROXY protocol, and share information about the original client connection. This information is sent as a transport-layer header as soon as the connection is established, and does not depend on any layer 7 protocol.
Enabling the PROXY protocol can be done via the write-proxy-v2
directive, as illustrated below:
write-proxy-v2 = on
Of course, if your backend only supports version 1 of the protocol, you can set it as follows:
write-proxy-v1 = on
There is also a proxy-proxy setting that is used when incoming
connections to Hitch are also made using the PROXY protocol. In that
case the incoming PROXY information is proxied to the backend.
Here’s an example of how you enable this:
proxy-proxy = on
The
write-proxy-v1,write-proxy-v2, andproxy-proxydirectives are all mutually exclusive with one another.
And of course, these settings can also be configured via the command line. Here’s the example that proves it:
$ sudo hitch -u hitch -f "[*]:443" -b "[127.0.0.1]:80" \
	--write-proxy-v2="on" /etc/hitch/cert.pem
Hitch is not aware of any layer 7 protocol, but TLS offers an extension to negotiate which application-layer protocol is about to be used.
The extension is called ALPN, which is short for Application-Layer Protocol Negotiation. The client announces the protocols it supports, and Hitch can then choose which application-layer protocol it supports.
ALPN is commonly used to check whether or not the server supports HTTP/2.
It seems a bit contradictory that a service like Hitch, which has no notion of layer 7 protocols, is actually getting involved in the layer 7 protocol negotiation.
But it’s all being done in the name of efficiency: because the negotiation is part of the TLS protocol, no extra roundtrips are required. And after all, apart from announcing application-layer protocols it supports, it does nothing with it afterwards.
Although Hitch is not strictly tied into HTTP, the primary use case of Hitch is terminating TLS for HTTPS connections.
Here’s an example where we configure ALPN protocols via the
alpn-protos directive:
alpn-protos = "h2, http/1.1"
When the client supports HTTP/2, this setting will result in an
HTTP/2 connection being established. Hitch will terminate the TLS
connection, and shuffle the rest of the bytes to Varnish. Because h2
was part of the ALPN list, the client will assume that Varnish
supports HTTP/2.
Therefore it is important to attach the -p feature=+http2 runtime
parameter to varnishd, otherwise the client will attempt to send
HTTP/2 traffic to Varnish even though it doesn’t support it.
If TLSv1.3 were used as a TLS protocol, the ciphersuites directive
would be used to determine which cryptographic algorithms are used.
Here’s the default value:
ciphersuites = "TLS_AES_128_GCM_SHA256:TLS_AES_256_GCM_SHA384:TLS_CHACHA20_POLY1305_SHA256"
Although cryptography itself is very much outside of the scope of this
book, it’s worth explaining what some of these values mean. Take for
example TLS_AES_128_GCM_SHA256.
This uses an Advanced Encryption Standard with 128bit key in Galois/Counter mode as the encryption algorithm. The hash that is used to ensure the authenticity of the encryption is a SHA256 hash.
These algorithms are exclusive to TLSv1.3 and have no overlap with
other TLS versions. If you’re on TLSv1.2 or older, you can use the
ciphers directive to describe the accepted cryptographic algorithms:
ciphers = "ECDHE-ECDSA-AES128-GCM-SHA256:ECDHE-RSA-AES128-GCM-SHA256:ECDHE-ECDSA-AES256-GCM-SHA384:ECDHE-RSA-AES256-GCM-SHA384:ECDHE-ECDSA-CHACHA20-POLY1305:ECDHE-RSA-CHACHA20-POLY1305:DHE-RSA-AES128-GCM-SHA256:DHE-RSA-AES256-GCM-SHA384"
By specifying both ciphersuites and ciphers, you remain compatible
with both TLSv1.2 and TLSv1.3. The reason for these two settings
being separate is that TLSv1.3 brought with it a completely new set of
cipher suites, none of which are compatible with older versions of
TLS.
We advise sticking with the default values, and when in doubt, have a look at https://wiki.mozilla.org/Security/Server_Side_TLS.
You can also choose who is in charge of selecting the used ciphers. The
prefer-server-ciphers directive is responsible for that.
This is the default value:
prefer-server-ciphers = off
This means the client chooses which cipher is used. If you set it to
on, Hitch will choose. In that case the order of the specified
ciphers is significant: a cipher specified early will take precedence
over the ones specified later.
OCSP is short for Online Certificate Status Protocol and is a protocol that checks the revocation status of TLS certificates. OCSP will check the status of the certificate by performing an HTTP call to the Certificate Authority’s OCSP server. The corresponding URL is stored inside the certificate. Although OCSP is a lot more efficient than its predecessor, the Certificate Revocation List (CRL) protocol, which downloaded a list of revoked certificates, it has potential performance implications.
Not only is there added latency for the end-user because of the OCSP call to the CA for every TLS connection, it also puts a lot of stress on the OCSP servers. These servers could end up serving millions of requests at the same time and might crumble under the heavy load. Unverified OCSP calls result in errors being displayed in the browser.
OCSP stapling is an alternative mechanism that shifts the responsibility for the OCSP call from the client to the server. This means that the server will perform occasional OCSP calls for the certificates it manages on behalf of the client. The resulting status is stapled onto the TLS handshake, and removes the need for a client to perform an OCSP call.
This means fewer roundtrips, less latency for the client, and less stress on the OCSP servers. When a client doesn’t receive a stapled response, it may perform the OCSP call itself.
Although it may appear that OCSP stapling can allow servers to falsely verify fraudulent certificates, there are security mechanisms in place to prevent this. The OCSP response is securely signed by the CA and cannot be tampered with by the server. If the signature verification doesn’t match, the client will abort the connection.
Hitch supports OCSP stapling and has some configuration directives to control certain aspects of this mechanism.
The ocsp-dir directive is the directory in which OCSP responses are
cached. The default directory is /var/lib/hitch:
ocsp-dir = "/var/lib/hitch"
The lifetime of a cached OCSP response is determined by whether the
refresh information is part of the response. When no such information is
provided in the response, Hitch will refresh the status of a
certificate with a certain frequency. This frequency is determined by
the ocsp-refresh-interval directive. By default this is 1800
seconds.
Here’s an example of how to lower the value to 500 seconds:
ocsp-refresh-interval = 500
When connecting to an OCSP server, the ocsp-connect-tmo and the
ocsp-resp-tmo should be respected. These settings represent the
connect timeout and last byte timeout for these connections. Their
respective default values are 4 seconds and 10 seconds.
Here’s an example in which we add some leniency by increasing the timeouts:
ocsp-connect-tmo = 6
ocsp-resp-tmo = 15
The stapled OCSP response is to be verified by the client, but by
enabling ocsp-verify-staple, Hitch will also verify the response and
remove the staple when the verification fails. It is up to the client to
perform the OCSP check itself.
Mutual TLS (mTLS) is a concept where both the server and the client must guarantee their respective identities via TLS certificates. For client authentication the same X.509 standard will be used to issue client certificates.
It is up to the client to present the certificate when connecting to the server using TLS. The server can then verify the validity of that certificate, based on a CA chain that is stored on the server.
Hitch supports mTLS and offers two configuration directives to enable this:
client-verify = required
client-verify-ca = "/etc/hitch/certs/client-ca.pem"
This example requires the client to authenticate itself using a client
certificate. This is done by setting client-verify = required. This
means if the client doesn’t provide a certificate, or the certificate
verification fails, the connection will be aborted.
If client-verify = optional is set, a client that does not send a
client certificate will still be allowed to connect. But if a client
sends a certificate that cannot be verified, the connection will be
aborted.
The default value is client-verify = none, which means no client
verification is required.
The client-verify-ca parameter refers to a file where the certificate
chain is stored. The server will use this chain of certificates to
verify the incoming client certificate.
Here’s an example of how to use client certificates with curl:
$ curl --cacert ca.crt \
	 --key client.key \
	 --cert client.crt \
	 https://example.com
In this example, curl will connect to https://example.com, which may
require the client to authenticate itself using a certificate.
--cacert parameter allows the client to send the certificate
chain. These are trusted certificates that the actual certificate
depends on.--key parameter contains the location to the private key. This
key is used to sign the certificate.--cert parameter refers to the actual certificate that is used
for authentication.Please note that the
--cacertparameter incurland theclient-verify-caconfiguration directive inhitchrefer to the same certificate chain.
When Hitch is used to terminate TLS connections in front of Varnish, it isn’t easy for Varnish to know whether or not the incoming request was an HTTPS request or a regular HTTP request.
There are some VCL tricks you can use to figure it out.
If you don’t use the PROXY protocol, you can check the value of the
X-Forwarded-For header, and if the corresponding IP address matches
the one from Hitch, you know you’re dealing with an HTTPS
connection. This isn’t 100% reliable because the IP address might also
be localhost, which doesn’t tell you a lot.
If you enable the PROXY protocol, you can run the following VCL code to check the server port:
vcl 4.1;

import std;

sub vcl_recv {
	if (std.port(server.ip) == 443) {
		set req.http.X-Forwarded-Proto = "https";
	} else {
		set req.http.X-Forwarded-Proto = "http";
	}
}
But there’s an even better way, which is by leveraging vmod_proxy, as
we talked about in chapter 5:
vcl 4.1;

import proxy;

sub vcl_recv {
	if (proxy.is_ssl()) {
		set req.http.X-Forwarded-Proto = "https";
	} else {
		set req.http.X-Forwarded-Proto = "http";
	}
}
This example uses the proxy.is_ssl() to figure out whether or not the
connection was encrypted via TLS. And there’s a lot more information
available that can be retrieved from the PROXY protocol.
Here’s an example where we extract a variety of so-called TLV attributes from the PROXY protocol header:
vcl 4.1;
import proxy;

sub vcl_deliver {
	set resp.http.alpn = proxy.alpn();
	set resp.http.authority = proxy.authority();
	set resp.http.ssl = proxy.is_ssl();
	set resp.http.ssl-version = proxy.ssl_version();
	set resp.http.ssl-cipher = proxy.ssl_cipher();
	set resp.http.client-has-cert-sess = proxy.client_has_cert_sess();
	set resp.http.client-has-cert-conn = proxy.client_has_cert_conn();
}
Let’s talk about the individual functions that were used, and the output they can return:
proxy.alpn() will return the ALPN token that was negotiated. This
will typically be one of h2 or http/1.1.proxy.is_ssl() will return a boolean. If the connections were made
using TLS it will be true, and it will be false otherwise.proxy.ssl_version() will return the TLS/SSL version that was used
during the session. TLSv1.3 is a common version that can be
returned.proxy.ssl_cipher() will return the encryption cipher that was used
to set up the encrypted connection. TLS_AES_256_GCM_SHA384 could be
a possible value.proxy.authority() will return the server name as it was presented by
the client during handshake. example.com is a possible value.proxy.client_has_cert_sess() will return a boolean. This function
will return true if the client certificate was provided for the
session. It is possible that the session was resumed on a new
connection, and that the handshake happened in a previous connection.proxy.client_has_cert_conn() will also return a boolean. This
function will return true if the client certificate was provided
for the connection.
vmod_proxyhas some other functions as well, but the TLV attributes that are retrieved in these functions are not processed by Hitch.
Although Hitch is simple, flexible, stable, secure, and very fast, Varnish Software noticed that some of its customers wanted to go beyond the limit of 100 Gbps per server.
This use case obviously doesn’t apply to your average Varnish user. But Varnish Software decided to find a solution and did so by offering a native TLS implementation in Varnish Enterprise.
This in-core TLS implementation can easily handle 200 Gbps on a single server and reuses the configuration syntax of Hitch.

As of Varnish Enterprise 6.0.6r2 you can use the -A runtime
parameter in varnishd, and point it to a Hitch config file for
native TLS to work.
Here’s an example of how to use -A :
$ varnishd -A /etc/varnish/tls.cfg -a :80 -f /etc/varnish/default.vcl
Please do not confuse -a with -A:
-a is used to define HTTP and PROXY listening addresses.-A is used to set up native TLS.Please note that there is no need to define the TLS port via -a :443
because this is all done in the Hitch configuration file.
As mentioned, native TLS support in Varnish Enterprise uses the Hitch configuration syntax. It is important to know that it only uses a subset of these configuration directives.
Keep in mind that native TLS doesn’t need to proxy data through to some backend, so all settings that are related to backend communication are in fact irrelevant. Varnish won’t complain if these settings are present, but it will ignore them.
Here’s a good example of a TLS configuration file that can be used in Varnish:
frontend = {
	host = "*"
	port = "443"
}

pem-file = "/etc/varnish/certs/example.com"

ciphersuites = "TLS_AES_128_GCM_SHA256:TLS_AES_256_GCM_SHA384:TLS_CHACHA20_POLY1305_SHA256"

ciphers = "ECDHE-ECDSA-AES128-GCM-SHA256:ECDHE-RSA-AES128-GCM-SHA256:ECDHE-ECDSA-AES256-GCM-SHA384:ECDHE-RSA-AES256-GCM-SHA384:ECDHE-ECDSA-CHACHA20-POLY1305:ECDHE-RSA-CHACHA20-POLY1305:DHE-RSA-AES128-GCM-SHA256:DHE-RSA-AES256-GCM-SHA384"

tls-protos = TLSv1.2 TLSv1.3

prefer-server-ciphers = false
Let’s break this configuration down:
frontend data structure will accept connections on port 443 on
all network interfaces.pem-file directive points to the certificate that will be used.ciphersuites is the list of ciphers that will be used for TLSv1.3
connections.ciphers is the list of ciphers that will be used for TLSv1.2
connections.tls-protos allows TLSv1.2 and TLSv1.3 to be used.prefer-server-ciphers directive states that the cipher selection
can be decided by the client.It seems quite convenient to be able to recycle your Hitch configuration file and benefit from native TLS.
The native TLS feature was exclusively built for performance and to go beyond the 100 Gbps per server threshold.
Under all other circumstances, we would advise you to continue using Hitch. The main reason being security.
Hitch is a separate process that runs under a different user than Varnish. If for some reason there is a TLS vulnerability, only the crypto part will be exposed. Your cache, containing potentially sensitive data, will not.
This separation of concerns can also be beneficial from a scalability point of view: you can scale your TLS separately from your caching, and make sure servers are tuned for their respective jobs.
But if you don’t care too much about these things, you just might appreciate the fact that native TLS removes the need to manage a separate TLS proxy. So that’s one less service to worry about, and one less thing that can fail on you.
When using native TLS in Varnish Enterprise, the use of vmod_proxy
becomes irrelevant because there is no proxying happening.
However, there is an alternative: it’s called vmod_tls, and it has a
similar API.
Here’s the TLS detection example from earlier where proxy and ssl
are replaced with tls:
vcl 4.1;

import tls;

sub vcl_recv {
	if (tls.is_tls()) {
		set req.http.X-Forwarded-Proto = "https";
	} else {
		set req.http.X-Forwarded-Proto = "http";
	}
}
This example will set the X-Forwarded-Proto request header with the
right scheme as its value. This allows the application to use the
right scheme for its URLs, and it can also decide to vary on this
header by setting Vary: X-Forwarded-Proto.
The other attributes can also be retrieved. Here’s an example where we return the various TLS attributes via response headers:
vcl 4.1;
import tls;

sub vcl_deliver {
	set resp.http.alpn = tls.alpn();
	set resp.http.authority = tls.authority();
	set resp.http.cert-key = tls.cert_key();
	set resp.http.cert-sign = tls.cert_sign();
	set resp.http.tls = tls.is_tls();
	set resp.http.cipher = tls.cipher();
	set resp.http.version = tls.version();
}
The output for these headers could be the following:
alpn: h2
authority: localhost
cert-key: RSA2048
cert-sign: RSA-SHA256
tls: true
cipher: TLS_AES_256_GCM_SHA384
version: TLSv1.3
We’ve been focusing so much on client-side TLS that we almost forgot to mention that backend TLS is also supported. This is a Varnish Enterprise feature, by the way.
Configuring backend connections over TLS is quite simple, as you can see in the example below:
backend default {
	.host = "backend.example.com";
	.port = "443";
	.ssl = 1;
	.ssl_sni = 1;
	.ssl_verify_peer = 1;
	.ssl_verify_host = 1;
}
It’s just a matter of enabling .ssl to turn on backend TLS. Keep in
mind that you should probably modify the .port as well and set it to
443.
SNI is enabled by default, but the example enables it explicitly.
The .ssl_verify_peer option validates the certificate chain of the
backend. By disabling this setting, the backend is allowed to use
self-signed certificates.
.ssl_verify_host, which is disabled by default, will check whether or
not the Host header of the backend request matches the identity of the
certificate.
The previously mentioned vmod_tls is also of benefit for backend TLS
connections. When used from the VCL subroutine vcl_backend_response,
it will report its values based on the current TLS backend connection,
using the exact same interface as described in the previous section.
As we near the end of the TLS section of the book, it is clear that end-to-end encryption of the connection is possible.
It’s safe to say that the crypto part is well-covered.