Managing a cluster of Varnish servers, deploying Varnish Configuration Language (VCL), tuning the right parameters, monitoring availability, and assigning roles to groups of servers. These are all operational responsibilities that can become quite a hassle when a lot of nodes are being managed.
There are plenty of tools out there that can be used for some of these tasks. However, the Varnish Controller is a specialized solution that integrates all these responsibilities.
The Varnish Controller is developed by Varnish Software and was the logical successor of the now deprecated Varnish Administration Console (VAC).
At the time of writing, the Varnish Controller is a brand-new product. The current features are primarily focused on VCL deployment. By the time you read this, the project may have gone through several iterations, be more feature-rich, and may look and behave a bit differently.
The Varnish Controller is a commercial product provided by Varnish Software and is not available in an open source incarnation.
The Varnish Controller was designed to be extremely flexible: the different services of the project can be run separately and can be scaled horizontally.
Communication with the controller is done via a RESTful API. These API calls are received by the API gateway. And all the way at the end, there are agents running on the Varnish instances that leverage the varnish management interface port to perform management tasks.
For the services in between the API gateway and the agents, there is a lot of inter-process communication going on. Communication between the various services is done using the Neural Autonomic Transport System (NATS) messaging service.
NATS is a lightweight, high-performance messaging service. The agents receive messages over NATS, which contain instructions, but the message queue is also used to report information.
The central service that manages all information and keeps track of the state is called the Brainz. The Brainz service reads from and writes to NATS, stores state in a PostgreSQL database, and also communicates with the API gateway over NATS. Any decision-making in the system is handled by the Brainz, or one of the Brainz, if running more than one.
And in the end, the API can be consumed directly or via clients like the command line interface (CLI) or the graphical user interface (GUI).
Here’s an architecture diagram containing the various services and how they are interconnected:
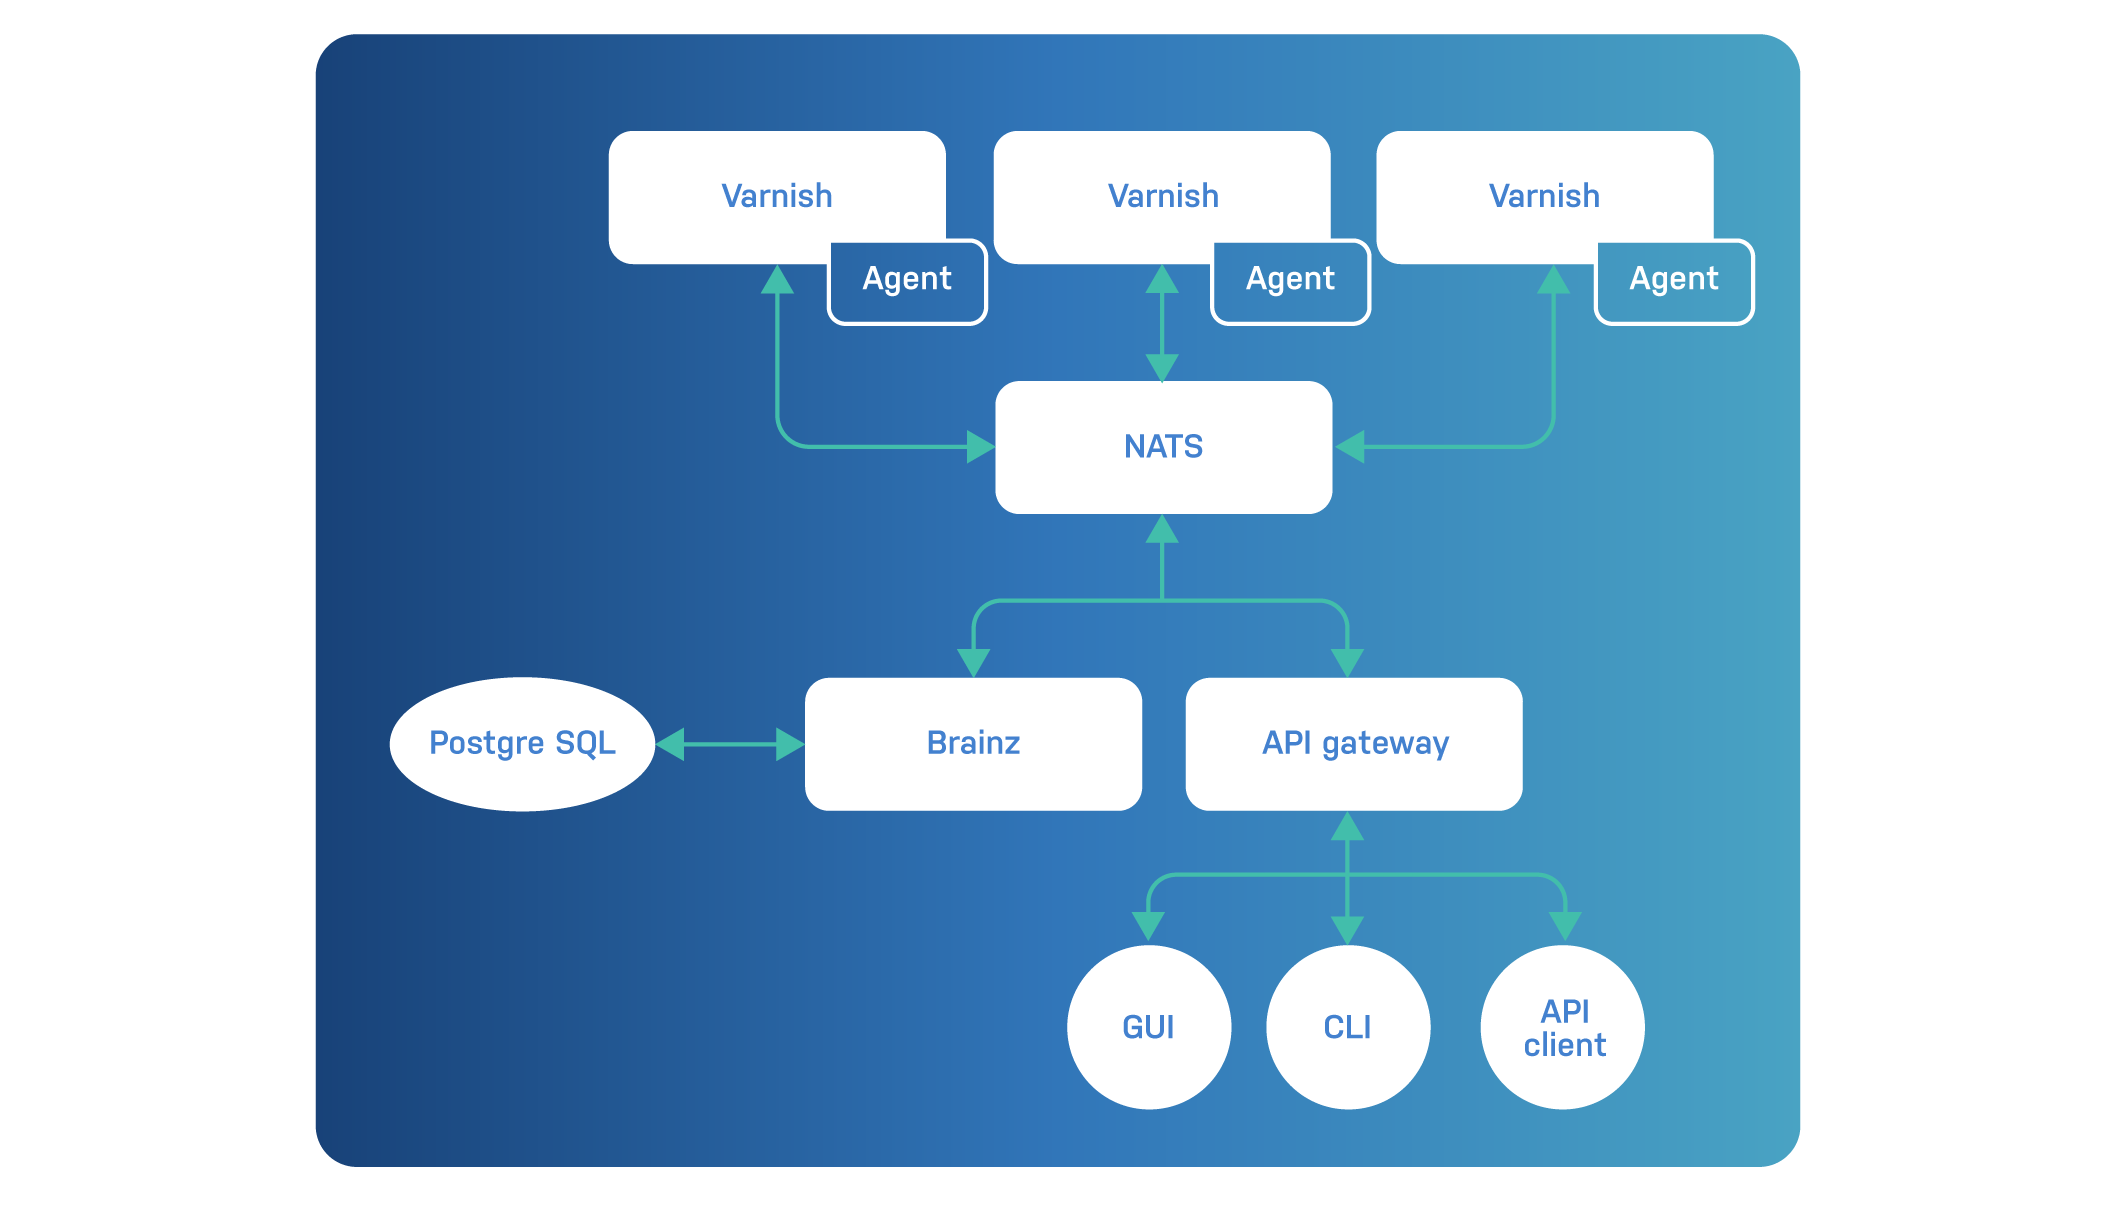
In this diagram, the core of the Varnish Controller doesn’t provide any redundancy. This was done for the sake of simplicity. In real life, you’ll have at least a cluster of NATS servers, a cluster of PostgreSQL databases, and multiple instances of Brainz and the API gateway.
Within the Varnish Controller, there are a couple of core concepts present. The concepts dictate how VCL code is going to end up on Varnish servers.
You can see these concepts, and how they are connected, in the following diagram:
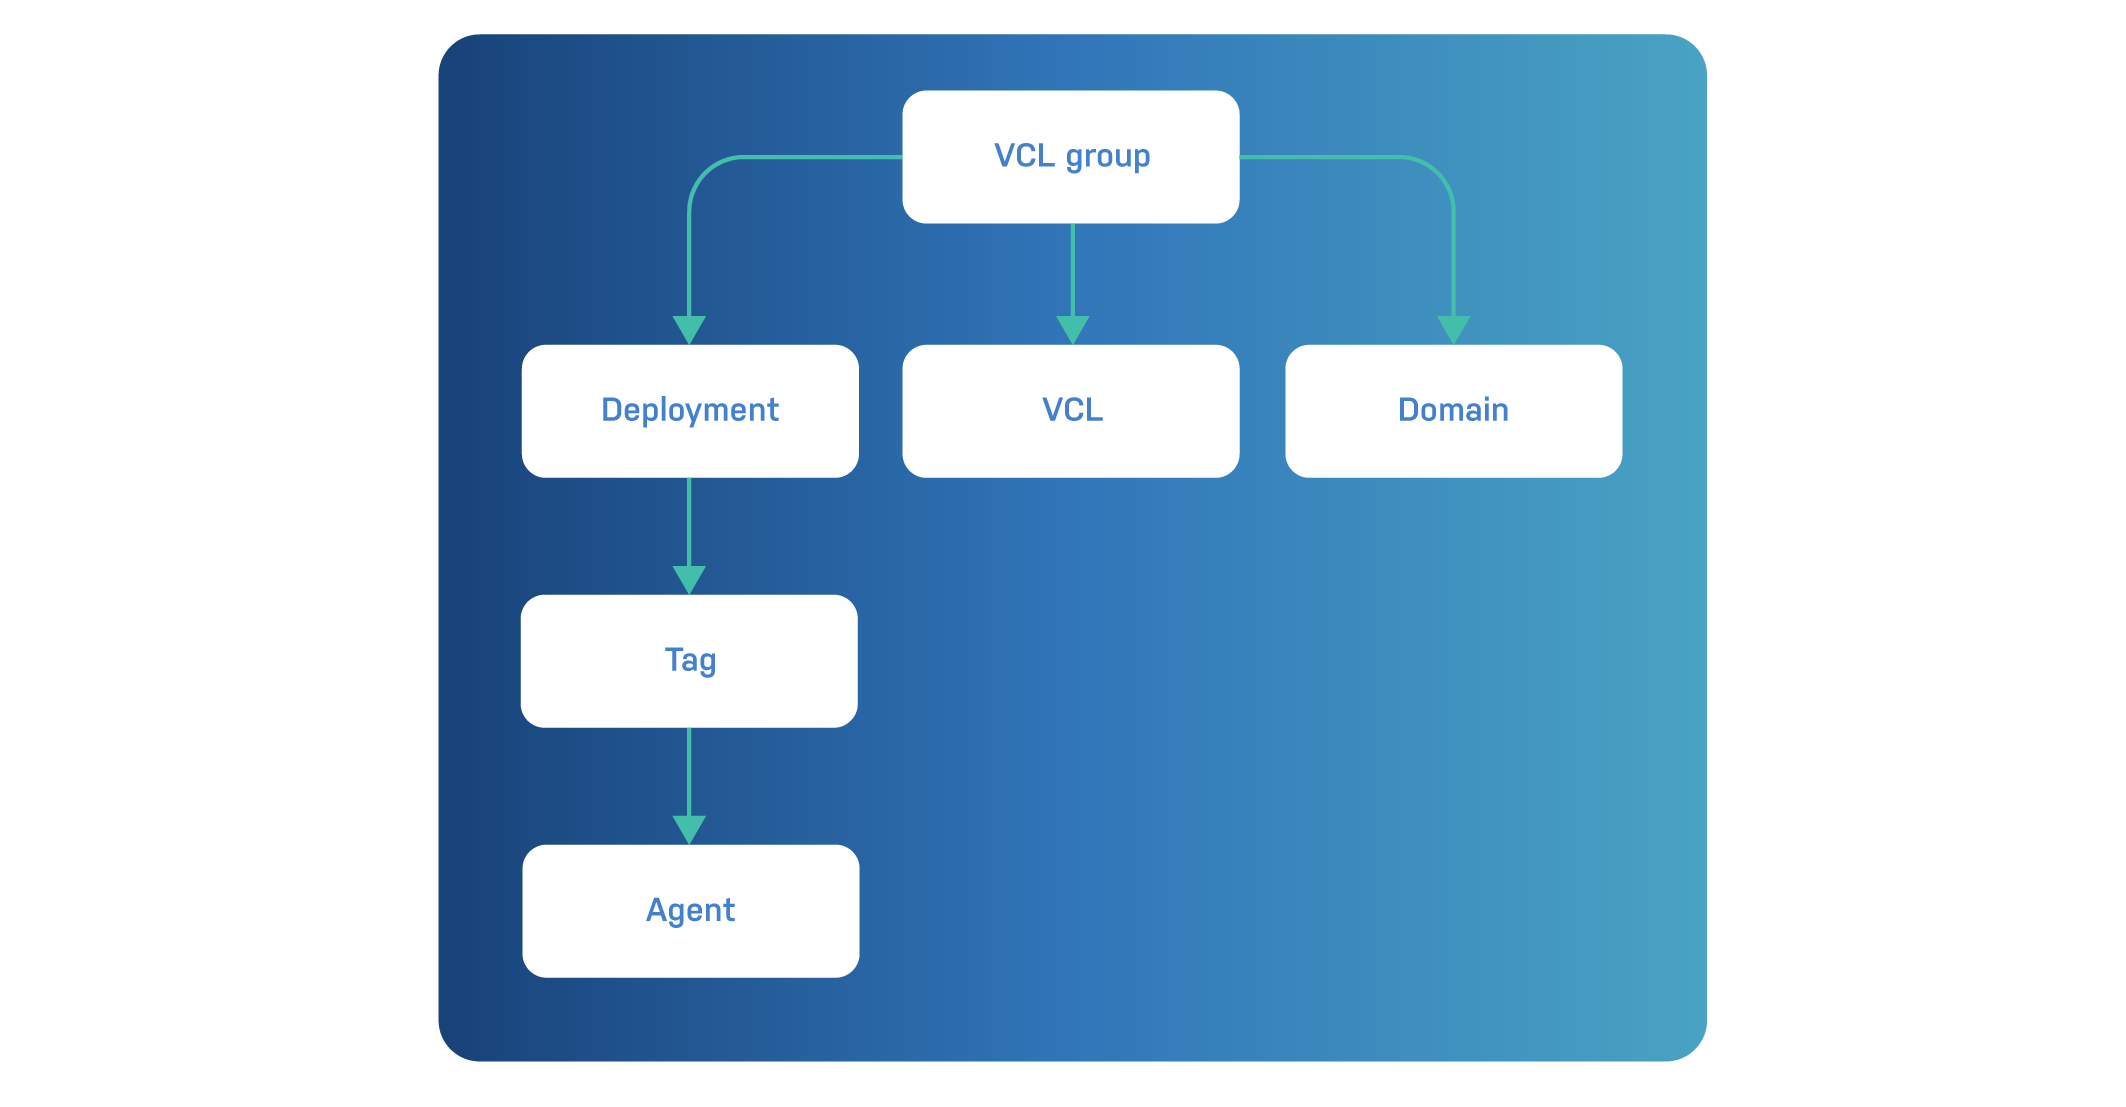
Let’s talk about the individual concepts. You’ll notice that they are nearly all related to VCL in some way.
When we talk about multi-tenancy, it’s not only about managing multiple organizations in one central place. It’s also about deploying VCL for multiple domains.
The controller is designed in such a way that a single Varnish server can host VCL configurations for multiple domains without interference.
Behind the scenes, the Varnish Controller generates a routing VCL using VCL labels to load the right VCL configuration for the right domain. The Varnish Controller needs exclusive access to the Varnish instance so any existing VCL code is unloaded from servers that are registered with the Varnish Controller.
It is also possible not to use domains, in which case the deployment is considered root deployment where you deploy one VCL per server, or one VCL to many servers. Each server in the Varnish Controller can either be a multi-tenant or a root deploy node.
At this point, VCL shouldn’t be a hard to concept to grasp. The controller manages a collection of VCL files that can be deployed to Varnish servers via the agents that run on them.
The VCL code could either be loaded for a specific domain or for the entire server it runs on.
VCL configurations can either be the main VCL file of the configuration, or one or more include files that can be included in the main configuration. The main VCL file is the file that gets used in Varnish, and any include statement will then load the accompanying files as the VCL is parsed by Varnish.
A deployment is an entity that links VCL configurations to eligible agents. This is done using tags: agents can have one or more tags and can be linked with multiple tags as well.
But a deployment will not deploy the selected VCL configurations to all matching agents. The deployment can be limited with a minimum and a maximum parameter.
If for example the minimum is set to two agents and the maximum to three agents, the deployment will at least try to find two available agents to consider the deployment successful. If three agents are available, the VCL will be deployed to all three agents.
Creating this range facilitates autoscaling. As the capacity of the cluster grows, more agents can register themselves with the controller, which results in automatic deployment if more agents register with the same tags. These can be both static tags or assigned tags.
The VCL configurations can be grouped into VCL groups. The VCL group is what ties it all together. As you may have noticed, VCL groups is at the top of the diagram of core concepts.
When defining a VCL group, a VCL configuration needs to be selected and one or more deployments as well.
If the VCL group is to be used only for requests matching specific domains, the domains will also be linked in the group. If not, the group considers this a dedicated server where the VCL acts as the root VCL.
The agent is a small service that runs on the Varnish servers that are managed by the Varnish Controller.
As mentioned, the agent leverages the Varnish management interface to perform management tasks. If the agent is configured in read-only mode, it will only use the management interface to retrieve information.
Otherwise, the agent will also use the management interface to deploy VCL to the Varnish server.
If you have a Varnish Enterprise subscription, you can use packages to install the various components. The individual components can be installed on the same machine, on separate servers, or in any combination.
Whether you’re using Debian, Ubuntu, Red Hat, or CentOS, the packages can be installed using the package manager of your choice.
The following packages are to be installed for the controller to work:
varnish-controller-natsvarnish-controller-brainzvarnish-controller-api-gwOf course, you’ll need a PostgreSQL installation as well.
On the individual Varnish servers that are to be managed by the
controller, the varnish-controller-agent package needs to be
installed.
If you want to interact with the Varnish Controller using the CLI,
the varnish-controller-cli package can be installed.
If you want to manage your Varnish cluster using a graphical user
interface, you can install the varnish-controller-ui package.
Both the CLI and the GUI leverage the Varnish Controller API, whereas the other components interact via the NATS message queue.
To keep access to the Varnish Controller as secure as possible, you can configure authorized access.
Either basic authentication can be used to gain access to the controller, but we also provide KeyCloak integration. KeyCloak is an open source identity and access management solution that supports multiple identity providers. You can use it to facilitate single sign-on, user federation and social login using OAuth2 and OpenID Connect.
You can create separate organizations, each with its own users. Users can be organization administrators or regular users. For each user, fine-grained permissions can be set. Even organizations can have different KeyCloak integrations or basic authentication.
The primary interface of the Varnish Controller is the RESTful API. Any other type of client will also use the API to get things done.
The first thing you need to do when you want to access or change resources via the API is to log in.
The /api/v1/auth/login endpoint does exactly that. Here’s an example:
$ curl -X POST -utest:test http://localhost:8080/api/v1/auth/login
{"accessExpire":1611232848,"accessToken":"eyJhbG...",
"refreshExpire":1611235848,"refreshToken":"eyJhbG..."}
Via the username test and password test we manage to create an
access token and a refresh token. The access token can be used in
subsequent API calls in the form of a Bearer Authentication Token.
This example uses
http://localhost:8080and the API gateway endpoint. It also uses very simplistic credentials that are presented using basic authentication. This is fine for testing, but in production, it will look quite different.
Here’s an easy way to extract the accessToken from the JSON output
via the jq program. The extracted value is stored on disk in the
access.token file.
$ curl -s -X POST -utest:test http://localhost:8080/api/v1/auth/login | jq -r ".accessToken" > access.token
Instead of having to paste the lengthy token in your curl command, you
can directly load it from the file, as illustrated in this example:
$ curl -v -H "Authorization: Bearer $(cat accesstoken)" http://localhost:8080/api/v1/agents | jq
[
  {
	"agentVersion": "1.0.1 - b9d5f3a892b8d8faef5e2986b8be18822f4d64ef",
	"created": "2021-01-21T11:50:34.838827Z",
	"id": 1,
	"lastHeartbeat": "2021-01-21T12:38:22.555717Z",
	"lastStateChange": "2021-01-21T11:50:34.841335Z",
	"name": "agent1",
	"state": 1,
	"tags": [
	  {
		"created": "2021-01-21T11:50:34.855042Z",
		"id": 1,
		"name": "prod",
		"static": true,
		"updated": "2021-01-21T12:38:15.563396Z"
	  }
	],
	"updated": "2021-01-21T12:38:22.556023Z",
	"varnishHost": "192.168.99.102",
	"varnishPort": 6081,
	"varnishState": "running",
	"varnishVersion": "plus-6.0.6r10 revision 048baeea9cfe2cd133e5115da7e1efa26d7901eb"
  }
]

> we'll keep using `jq`, because it makes the *JSON* output a lot more
> readable.
Here’s a final example where we’ll upload a VCL file to the controller:
$ curl -X POST -H "Authorization: Bearer $(cat accesstoken)" "http://localhost:8002/api/v1/vcls" -d '{ "id": 2, "name": "synthok", "source": "vcl 4.1;\n \n backend default none;\n \n sub vcl_recv {\n     return(synth(200,\"ok\"));\n }"}' | jq
{
  "contentType": "text/plain; charset=utf-8",
  "created": "2021-01-21T13:17:50.3050258Z",
  "encoded": false,
  "fileType": 1,
  "id": 5,
  "name": "synthok",
  "sha": "\"1736e032c6dd3d45d8aa81782b6c7131b481437ae86c90ac909260176a524cb3\"",
  "source": "vcl 4.1;\n \n backend default none;\n \n sub vcl_recv {\n     return(synth(200,\"ok\"));\n }",
  "updated": "2021-01-21T13:17:50.3050258Z"
}

> Full *Swagger API*-based documentation is available via
> `http://localhost:8080/docs/index.html`. Please change the hostname
> and the port of this *URL* to the endpoint of your *Varnish Controller
> API gateway*.
The API is nice, it works great, it is clean, but it’s still an API and not that user-friendly.
For people who are comfortable working on the command line, using the Varnish Controller CLI is a significant improvement in terms of user experience.
If you have the varnish-controller-cli package installed, you can
easily interact using the vcli program.
Logging in is done via vcli login. You can pass the API endpoint,
your username, password and organization:
$ vcli login http://localhost:8002 -u test -p test -o myorg
Configuration saved to: ~/.vcli.yml
Login successful.

> Please note that the *login URL* shouldn't have an ending `/`.
vcli keeps track of the state and stores the access and refresh tokens
in ~/.vcli.yml. The next time you login, you can use the vcli login
command and the refresh token will ensure you have access again.
If you’re logging in using admin credentials, there’s no need to mention the organization during the login procedure.
Listing agents is as simple as running vcli agent list
$ vcli agent list
+----+--------+---------+----------------+-----------------+---------+
| ID |  Name  |  State  |  Varnish Host  | Varnish Version |  Tags   |
+----+--------+---------+----------------+-----------------+---------+
|  1 | agent1 | Running | 192.168.99.102 | plus-6.0.6r10   | (1)prod |
+----+--------+---------+----------------+-----------------+---------+
Here are the available vcli commands:
accountagentapilogdeploymentdomainsfilehelpidploginlogoutorganizationpermissionsessiontagsutilvclvclgroupversionWhen you use the help subcommand, you’ll get a lot more information
about other subcommands and their capabilities. Here’s an example of
what vcli vclgroups is capable of:
$ vcli vclgroup help
Handle VCLGroup such as listing, add, delete or update.

Examples:
  vcli vclgroups inspect 1
  vcli vclgroups list
  vcli vclgroups list -f name="*MyVCL*"
  vcli vclgroups add MyVCLGroupName --vcl 1 --dep 1 --root
  vcli vclgroups update 1 --name newName --root=false --dep 1,2
  vcli vclgroups delete 1
  vcli vclgroups stage 1
  vcli vclgroups promote 1
  vcli vclgroups delstage 1
  vcli vclgroups stats 1

Usage:
  vcli vclgroup [command]

Aliases:
  vclgroup, vg, vgs, vclgroups

Available Commands:
  add         Add new VCLGroup
  delete      Remove a VCLGroup
  delstage    Delete a staging for a VCLGroup
  deploy      Deploy a VCLGroup
  inspect     Inspect a VCLGroup's details
  list        List VCLGroups
  promote     Promote a staged VCLGroup from staging to production
  reload      Reload a VCLGroup on servers
  stage       Stage a VCLGroup
  stats       Show varnish statistics for VCLGroups
  undeploy    Undeploy a VCLGroup
  update      Update a vclGroup
In terms of speed of execution for simple tasks, it’s tough to beat the efficiency of the CLI. However, a graphical user interface makes the controller a lot more user-friendly.
Whereas the CLI and API present the core concepts as individual resources, the GUI will group these concepts into an intuitive interface. Some of the complexities are nicely hidden.
Here are a couple of screenshots:
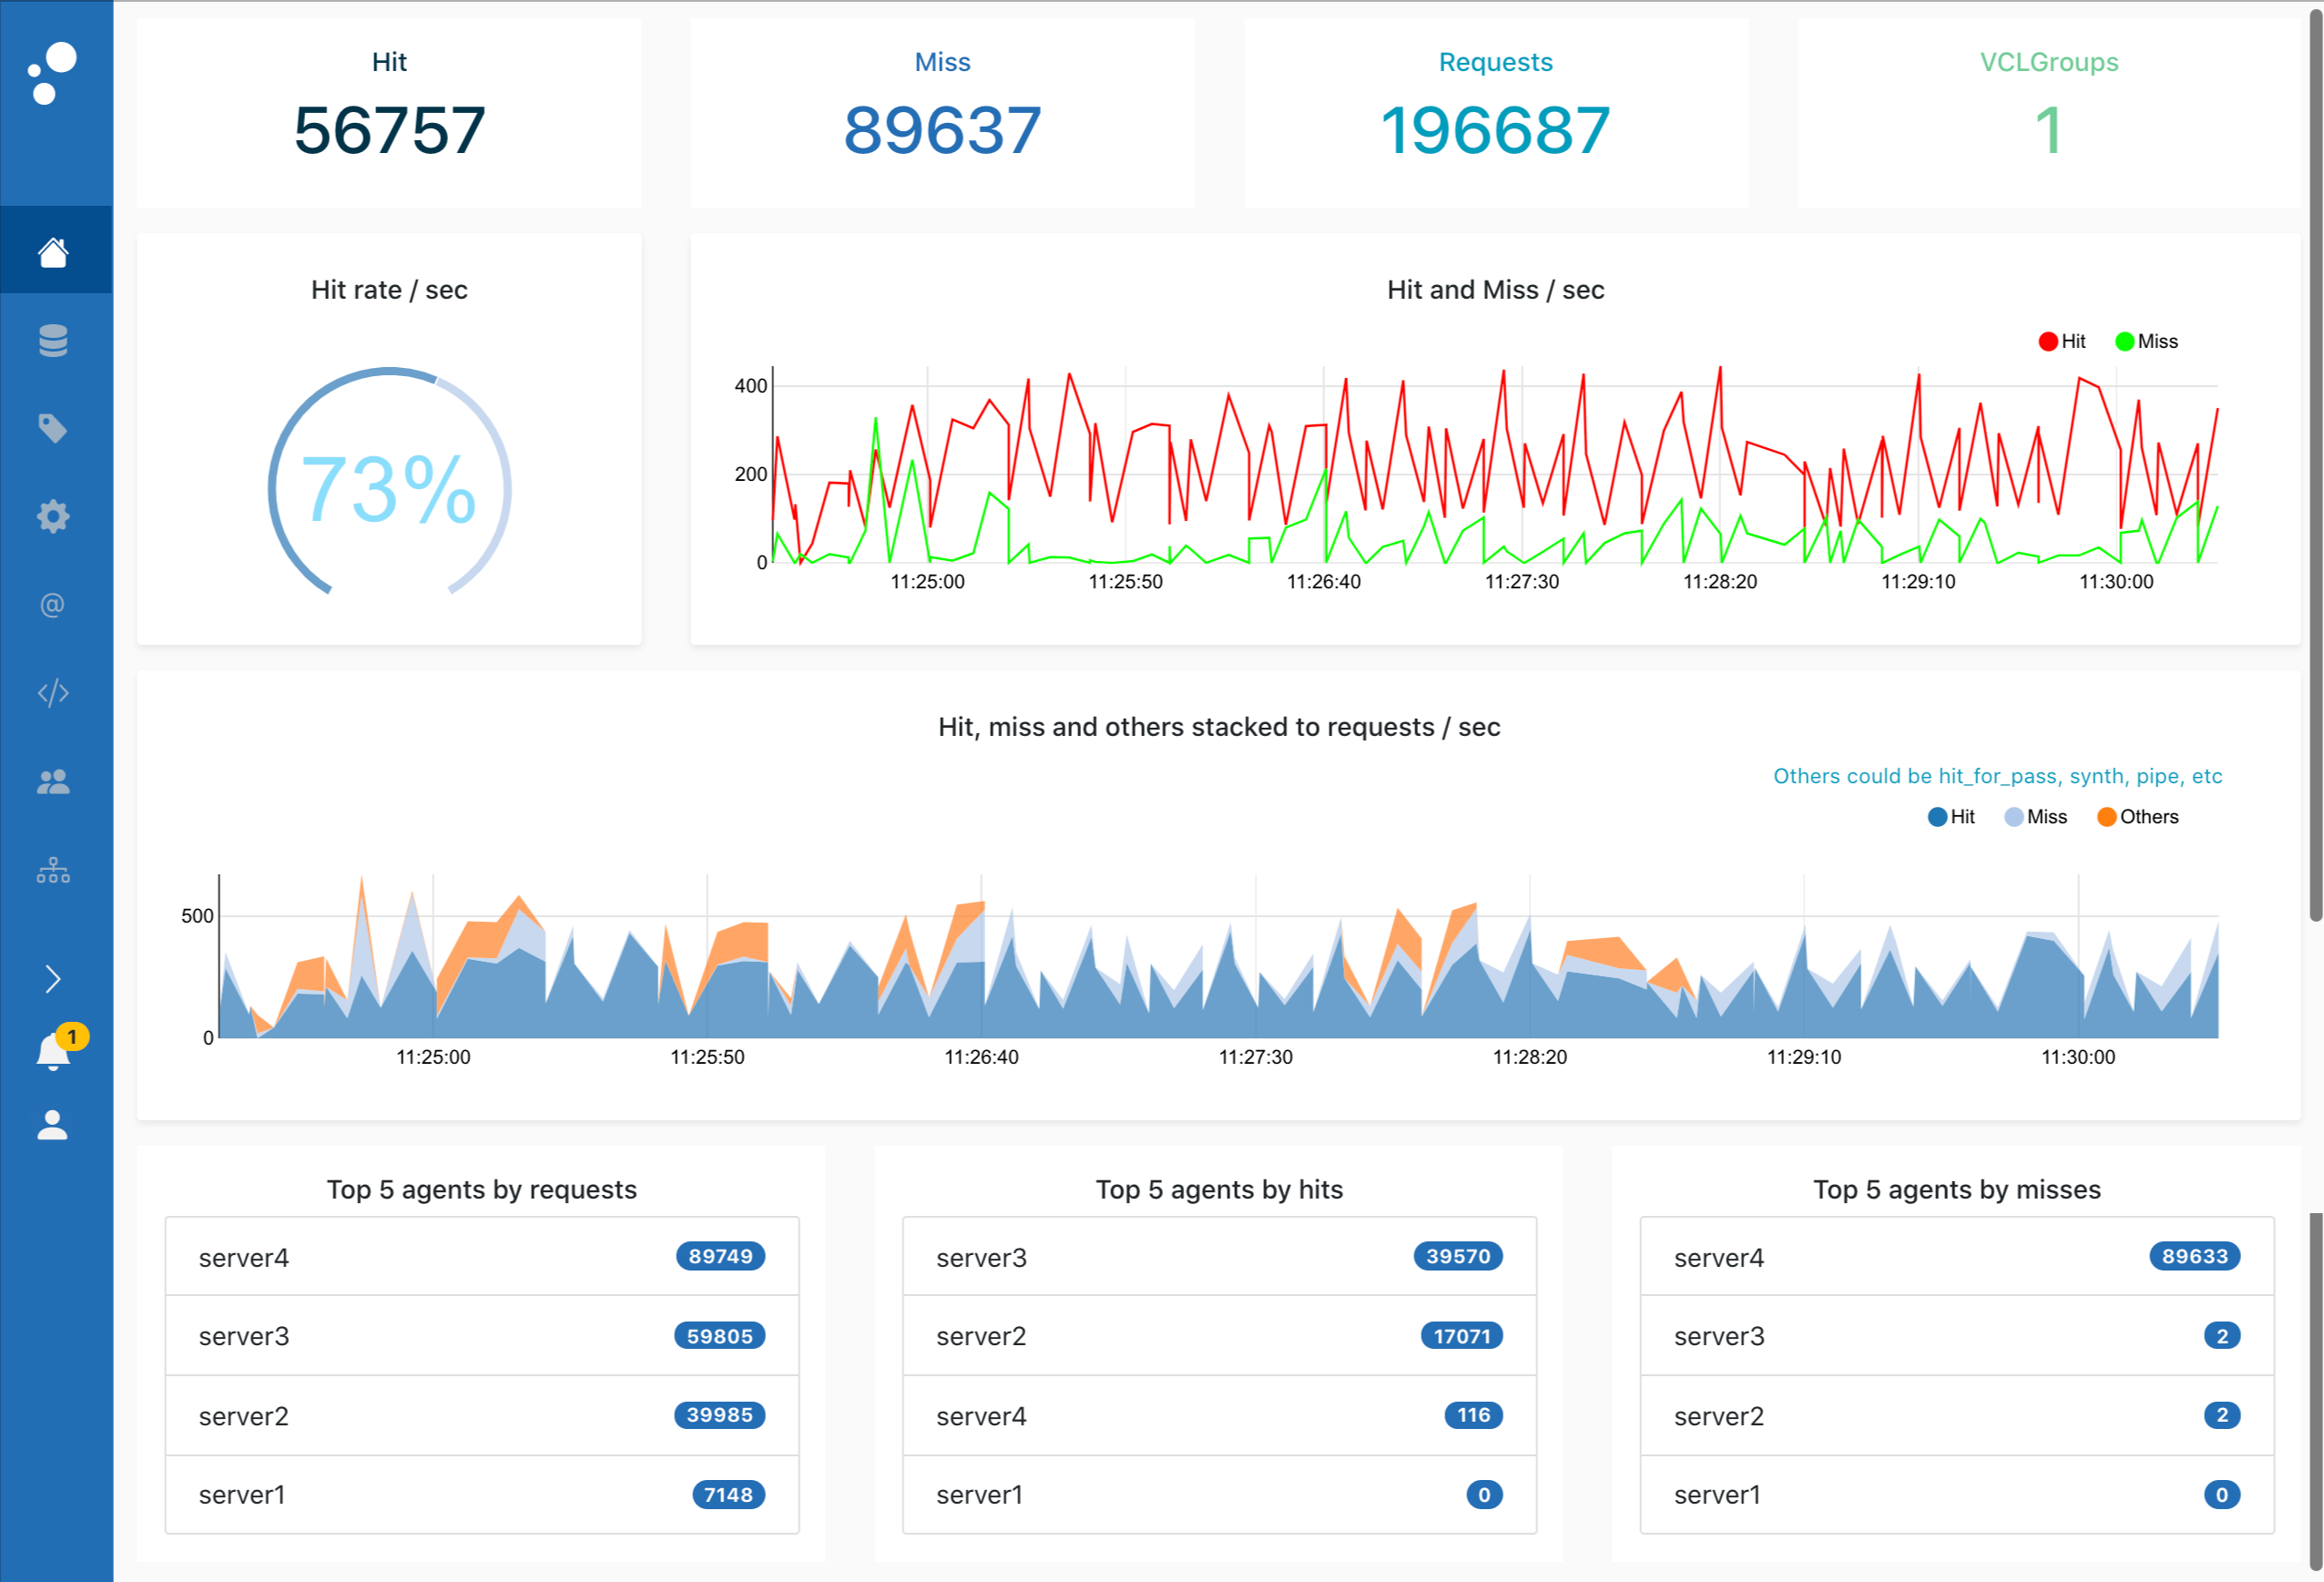
The first screenshot features the dashboard. It contains an overview of various counters, graphs, and lists. As this project evolves, more useful metrics will be integrated into the dashboard.
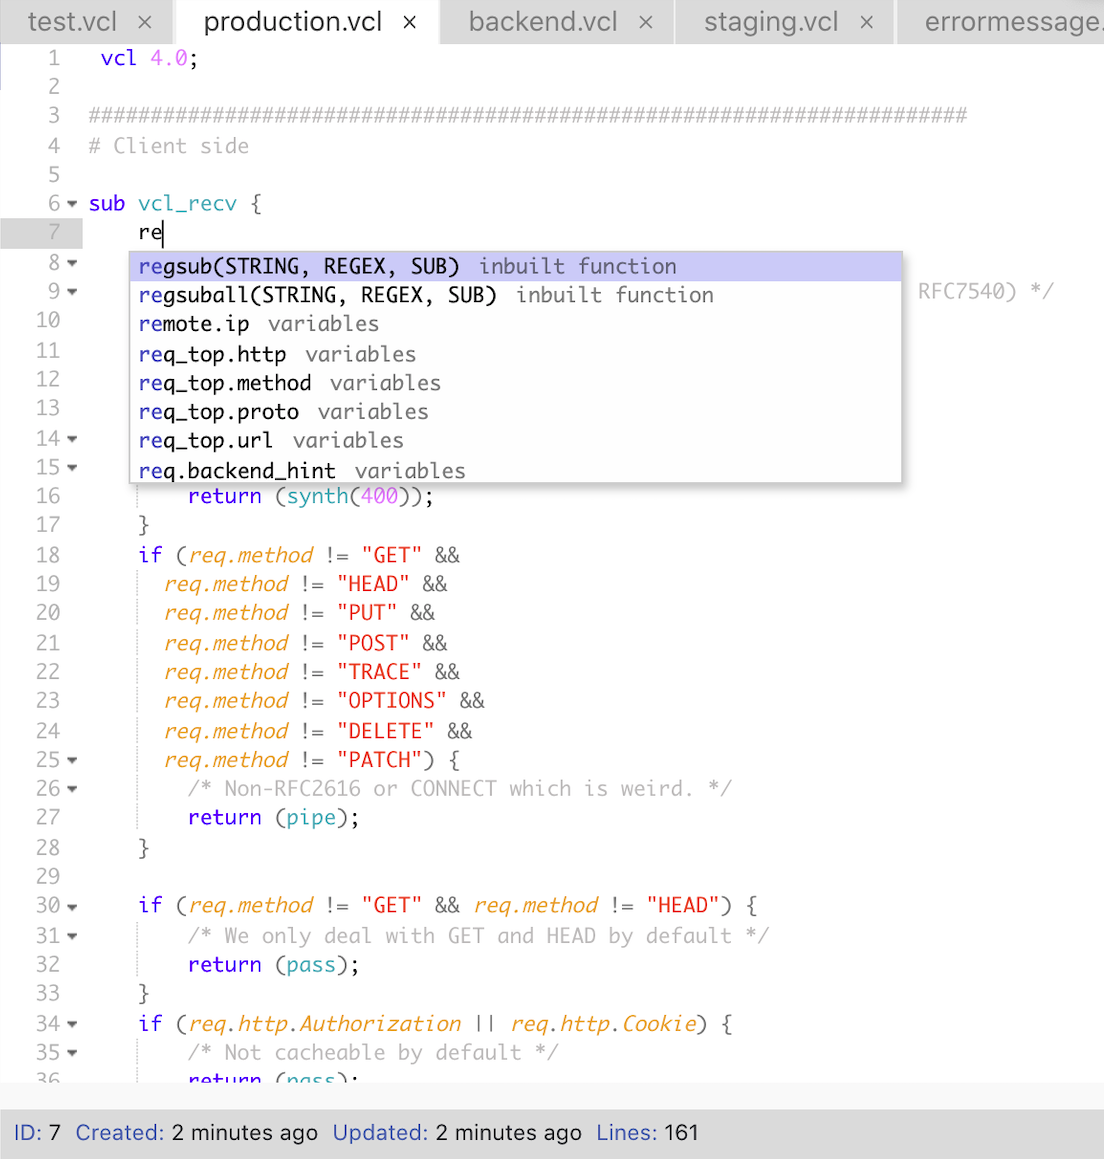
The next screenshot features the built-in VCL editor. Not only can you upload VCL files, but you can also create new ones. The editor has syntax highlighting and code completion, which offers an excellent experience for composing VCL code.
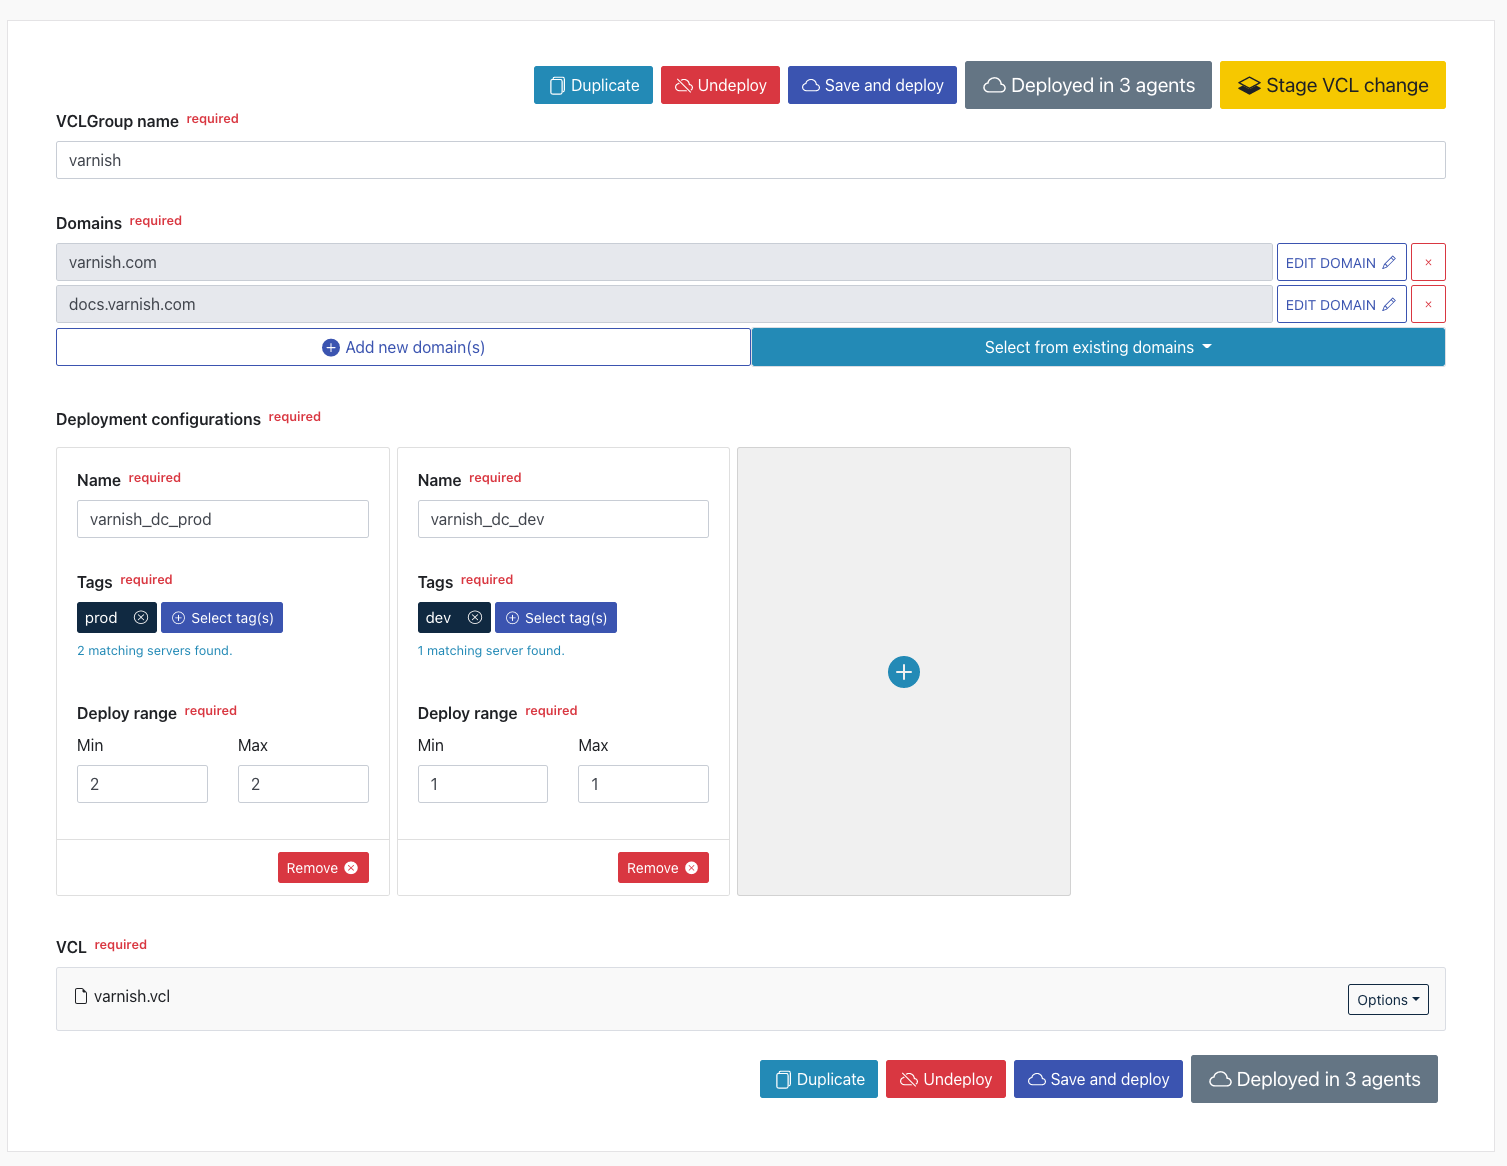
The following screenshots show how various configuration concepts are nicely integrated into a single workflow. This clearly shows how VCL groups, deployments, VCL files, and domains are connected.
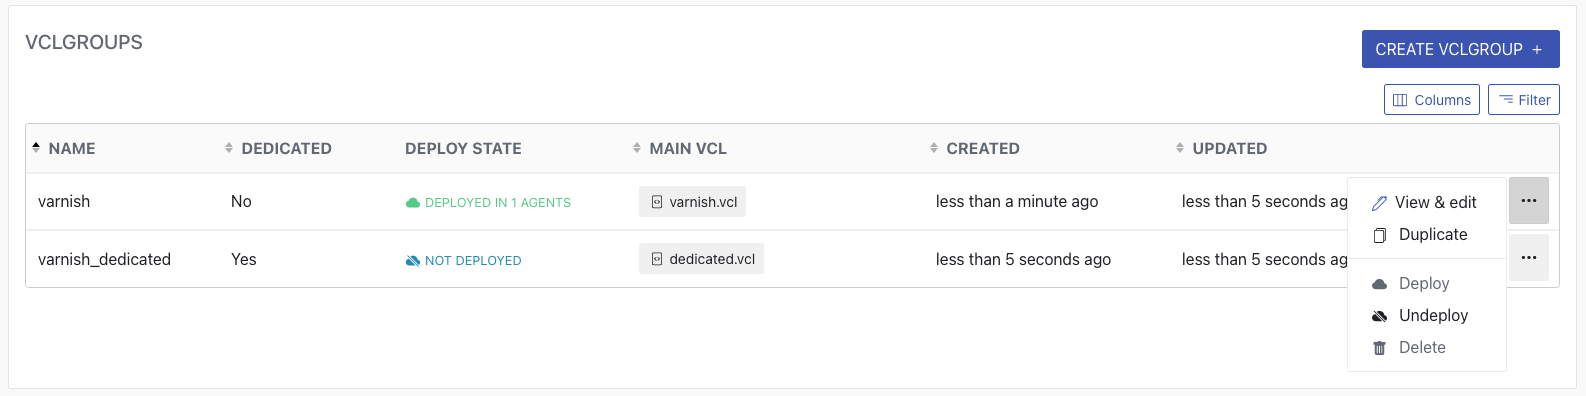
The end result is a deployable VCL group, and the last screenshot shows the overview of available configurations:
Please note that by the time you read this book, or by the time you’re considering using the Varnish Controller, the GUI might look a bit different. Despite stable releases, this product is still in development. There will still be a lot of feature updates, but also cosmetic updates that will impact the look and feel of the GUI. Follow https://docs.varnish-software.com/varnish-controller/changelog/ for Varnish Controller changelogs.