Varnish Controller
This tutorial will create a simple video streaming website using HTTP routing with the Varnish Controller.
You can skip the details and jump straight to Setup Test Environment chapter. The first part will describe the details of the configuration and is highly recommended to get an understanding of the setup.
All files and the video used for this tutorial is available here: https://github.com/varnish/router_example
Requirements:
The environment in this tutorial consists of a docker-compose that brings up the following services:
To make this easy without involving DNS configuration, we add the following hosts into our /etc/hosts file to point to our services. The IP addresses
are specified in the docker-compose file and will be the same in your environment.
172.31.0.200 origin.example.com
172.31.0.201 cache1.example.com
172.31.0.202 cache2.example.com
172.31.0.203 router.example.com
172.31.0.203 mysite.example.com
172.31.0.206 api.example.com
172.31.0.208 ui.example.com
ui.example.com - The Varnish Controller Web User Interfaceapi.example.com - The Varnish Controller REST APIcache1.example.com - The first Varnish Cache Plus servercache2.example.com - The second Varnish Cache Plus serverorigin.example.com - The origin HTTPd server that serves the website, video-manifest and video files.mysite.example.com - Our website, pointing to the traffic routerThe default login to Varnish Controller is username test and password test (specified in the docker-compose file). This user
is a system admin user and can be used to access both the UI and the CLI.
The setup contains some data volumes required for storing persistent data. The first, vcontroller is mounted to /etc/varnish and is used by both the agent and Varnish. The agent
writes the files here and Varnish reads some of the files.
The second volume is varnish, mounted to /var/lib/varnish. This is used by Varnish but the agent needs access to this directory in order to read
statistics from Varnish.
The most important configuration part for the agents, related to traffic routing is this configuration option (seen in the docker-compose.yaml):
"VARNISH_CONTROLLER_BASE_URL=http://cache1.example.com"This is the URL to the Varnish Cache server that the agent supervises and is used for request routing. All requests towards the router that is redirected to this Varnish server will have this URL as a base for the routed location.
In this tutorial we only do HTTP routing. If we want to enable DNS routing, we need to configure the IP addresses for our
Varnish server. Namely the options VARNISH_CONTROLLER_IPV6 and VARNISH_CONTROLLER_IPV4.
This tutorial only uses one small VCL, for both the website and the streaming, to keep it simple.
The VCL adds a synthetic response for the path /ping and is configured for the router to verify health of the domain on the
Varnish server. We also add CORS so that we can serve files from our different Varnish cache nodes. The backend is the
origin server we have configured in the docker-compose.
Note the regsub that is being used. Varnish Controller version 5 is handling this automatically
when deploying as a shared deployment. But for versions prior to 5.0 of the controller and if the deployment is a root (dedicated) deployment, this needs to be used to handle redirected requests.
The reason for the regsub is that the URL that comes in when being routed is of the format: http://<varnish_node_host>/<my_domain>/<file>. Hence,
our URL contains the Varnish host first and then the actual domain of our website. The regsub converts the URL to the format http://<my_domain>/<file>.
vcl 4.1;

backend default {
    .host = "origin.example.com";
    .port = "80";
}

sub vcl_recv {
    if (req.url ~ "/ping") {
        return (synth(200, "OK"));
    }

    // Uncomment for versions prior to Varnish Controller 5.0,
    // or if deploying as a dedicated/root deployment.
    // set req.url = regsub(req.url, "/([^/]*)/", "/");
}

sub vcl_backend_response {
    set beresp.http.Access-Control-Allow-Origin = "*";
    set beresp.http.Access-Control-Allow-Methods = "GET,HEAD";
}
The video manifest for this tutorial consists of absolute paths to our video segments. The domain mysite.example.com points to the router IP. That means that each
request will be routed by the traffic router to an appropriate Varnish server.
Snippet from the manifest file (absolute.m3u8):
#EXTM3U
#EXT-X-VERSION:3
#EXT-X-TARGETDURATION:10
#EXT-X-MEDIA-SEQUENCE:0
#EXTINF:3.708333,
http://mysite.example.com/video1/anime0.ts
#EXTINF:10.416667,
http://mysite.example.com/video1/anime1.ts
#EXTINF:10.416667,
http://mysite.example.com/video1/anime2.ts
...
The website we are using in this tutorial is a very small HTML page that makes use of the video-js library to present a html5 web player for streaming of our video.
Note that it requests the file absolute.m3u8 which is our video manifest file.
<html>
<head>
    <link href="https://vjs.zencdn.net/7.18.1/video-js.css" rel="stylesheet" />
</head>

<body>
  <center>
     <video id="my-video" class="video-js" controls preload="auto" data-setup="{}">
          <source src="./absolute.m3u8" type="application/x-mpegURL" />
     </video>
     <script src="https://vjs.zencdn.net/7.18.1/video.min.js"></script>
  </center>
</body>
</html>
The Varnish Controller configuration to set things up is fairly easy. The commands are provided in the deploy.sh script. The commands below assume that no commands have been executed before. Hence, the ID’s are the ones listed below.
In the deploy.sh script, the vcli is executed via a docker container that is provided via the quay.io/varnish-software/varnish-controller-cli image from Varnish container repository.
Note: All configuration below can be performed via the Web UI as well (http://ui.example.com).
vcli login http://api.example.com:8002 -u test
vcli tag add prod
vcli agent tag 1,2 -t 1 -y
web.vcl and give the uploaded file the same name.vcli file add web.vcl web.vcl
mysite.example.com. This domain will point to the router IP as we will traffic route this URL for
both the website and the video streaming (configured in /etc/hosts for this tutorial).vcli domain add mysite.example.com
lookup-order=random - This will tell the router to randomly select a healthy Varnish server.http - Enable HTTP routing for this RoutingRuleshealth-path - Path to check for health (corresponds with our synth response in the VCL)debug-headers - Enable HTTP debug headers to give us information on routing decisions etc.health-timeout - Timeout for health checkshealth-window-size - How large our health check sliding window should be.health-window-threshold - How many checks that should be healthy out of our window-size before using that endpoint for routing.vcli rr add video --lookup-order=random --http --health-path=/ping --health-interval=1s --debug-headers=true --health-timeout 1s --health-window-size 3 --health-threshold 2
dep - Deployment configuration ID 1rr - RoutingRules to be used with ID 1vcl - VCL with ID 1 (our uploaded VCL)dom - Our domain, corresponds to the mysite.example.comvcli dep add prod -t 1 --max 2
vcli vg add mysite --dep 1 --rr 1 --vcl 1 --dom 1
vcli vg deploy 1
git clone https://github.com/varnish/router_example
Retrieve a Router enabled Varnish Controller license (contact support) and add this file in the cloned directory.
Name the file router_license.lic.
You should now have the following structure:
router_example
├── deploy.sh
├── docker-compose.yaml
├── README.md
├── router_license.lic
├── website
│   ├── absolute.m3u8
│   ├── index.html
│   └── video1
└── web.vcl
# Add the following lines to the file '/etc/hosts':
172.31.0.200 origin.example.com
172.31.0.201 cache1.example.com
172.31.0.202 cache2.example.com
172.31.0.203 router.example.com
172.31.0.203 mysite.example.com
172.31.0.206 api.example.com
172.31.0.208 ui.example.com
-d to daemonize to the background)docker-compose up -d
Wait a couple of seconds to make sure the system comes up and running before continuing.
test and password: test../deploy.sh
Note that it can take a couple of seconds before everything is deployed since the router will not make the website available until at least one endpoint is healthy (since we also route the website via the router).
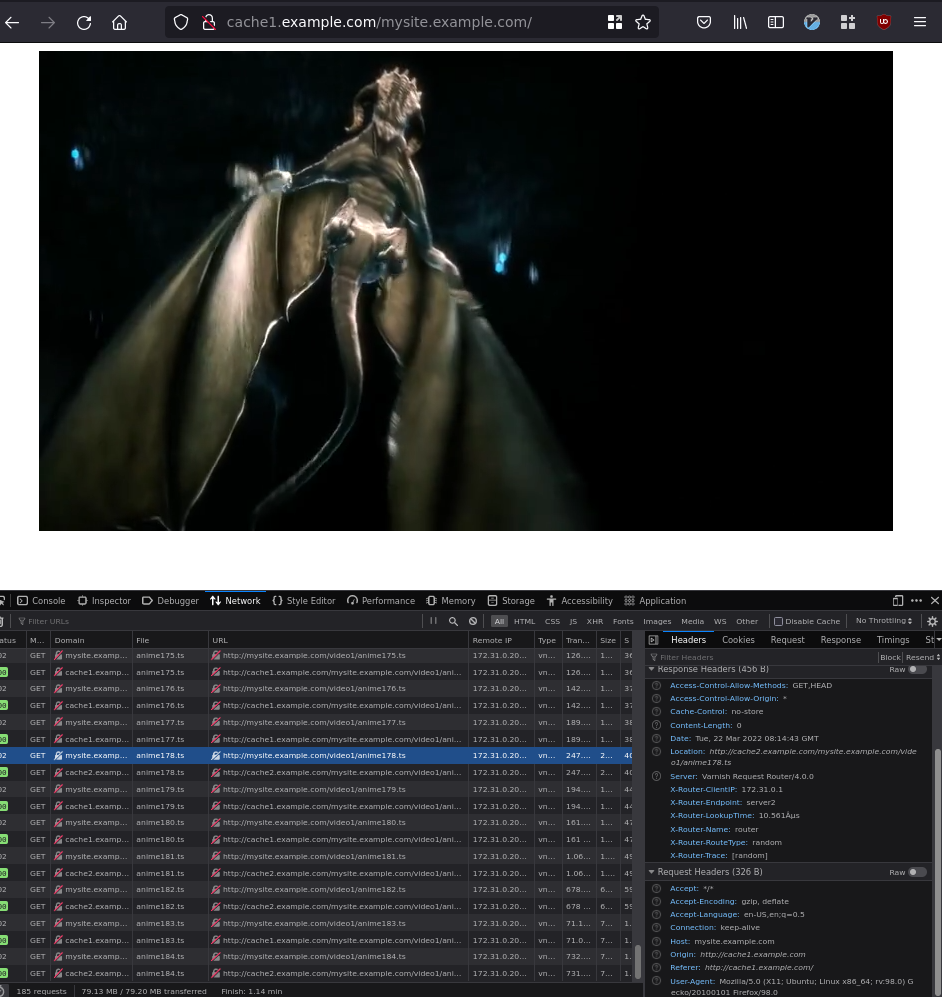
If everything works, you should be able to see a webpage like the below if you open up http://mysite.example.com in your web browser. As you can see in the screenshot below, the URL will be traffic routed to one of the Varnish servers, in this example cache1.example.com.

And if you open up the web browser development tools (ctrl-shift-i in Firefox/Chrome) for the page, you will be able to see which nodes serve which video segments. You can
also click a request to see the debug-headers where it gives you some information about the decisions the router took and how long the decision took to make.
Once you have the setup running you can elaborate with changing the configuration of RoutingRules, such as the lookup-order. These changes will be applied directly. You can also test to stop one of the varnish
servers and see that the video still plays but are now only routed towards one of the running caches.
# Stop varnish1 and see that all requests will continue going only to "cache2.example.com".
docker-compose stop varnish1
You can reconfigure everything either via the CLI or the UI (http://ui.example.com). Default login test/test.
The docker-compose will create volumes for storing database and other configuration data. These can be cleaned up if you want to start from scratch.
# Stop environment
docker-compose down
# Remove volumes
docker volume rm router_example_dbdata router_example_varnish router_example_vcontroller