Varnish Controller
This page refers to invalidations like purging, banning, and tag-based. Support has been added in Version 3.0.0. of Varnish Controller. There are built-in features that make invalidations easy to use in a multi-layered setup, and the selection is based on VCLGroup, domains, and tags. These configurations can be combined to only invalidate for a single domain in a VCLGroup or, first, to invalidate a storage layer. Once that’s finished, the edge layer can also be invalidated.
An invalidation can have these states:
The following states only apply when monitor agents is enabled in the invalidation request:
To start using invalidations, you’ll need to set up support for purging and/or banning in VCL, as Varnish Controller doesn’t change or add logic to handle invalidations. You’ll need to allow it them from localhost, otherwise, anyone can send invalidation requests. Varnish Controller does basic ACL (access control list) checks for logged-in users, who can only send invalidation requests to VCLGroups, tags, or domains that they have access to.
There is also support to specify HTTP headers for invalidation requests, which makes it possible to add access control via headers. There is a tutorial that can teach you how to set up purging with ACL. In a containerized environment, using CIDR blocks is recommended.
When an invalidation request comes in, Brainz filters the agents and sends it to the ones that need invalidation over NATS. Then, the agent locally sends an HTTP request to the domain from localhost with the configured HTTP request. This happens parallelly and asynchronously from the invalidation request. You can check the invalidation state to monitor the progress.
Invalidations are automatically removed after one hour if they succeed or fail, which can be configured with the -remove-invalidations 1h option in Brainz. The agent’s errors are cleared when an invalidation is deleted.
*Note: Varnish Controller will see any invalidation request that has a different response status code than 200 as failed.
Monitoring agents is used to:
When setting the flag monitor agents, it’s recommended to set a good execution TTL, as monitoring will stop when it is reached.
Agents that are down, or have NATS connection issues at the time the invalidation requests are sent, will be invalidated as soon as the agent is reachable again. The VCLGroup still needs to be deployed to that agent for the invalidations to run. The request can hang in the monitoring state if a tag, domain, or VCLGroup that is attempted to be invalidated was previously deployed to that agent, as it will serve the old caches. It’s important that the invalidation monitors if there’s a change and invalidations are run as soon as the agent has that tag, domain, or VCLGroup again.
There’s a list with agents to monitor and reasons explaining why the agent is being monitored. This list will explain most situations; current possible reasons are:
Agents that are read-only will not be invalidated or monitored.
The execution TTL tells Brainz how long the overall invalidation request is allowed to run. The defaul is two minutes. If it takes longer, the invalidation request will show as failed. This is good to use in combination with the monitor agents feature, which you can set to one hour (for example). If, in that hour, agents become reachable that were down when sending the invalidation request, it will run the invalidation on those agents.
If the invalidation error gets a failed state and you want to know why, check the invalidation response. You can see Brainz errors if one occurred, but most likely it will be agent errors. Agent errors are logged per agent, per domain, and per path, and can be large if you send in a lot of paths at once.
There are two endpoints available to view agent errors. To see them grouped based on agent, domain, and status code, use the /api/v1/invalidations/{invalidation}/errors-grouped endpoint. In the following example, there are a total of 24.000 errors; 12.000 per server and all on the same domain. This generates the following output:
[
    {
        "agentName": "server3",
        "errorCount": 12000,
        "host": "example.org",
        "statusCode": 500
    },
    {
        "agentName": "server1",
        "errorCount": 12000,
        "host": "example.org",
        "statusCode": 500
    }
]
To view a list of errors, you can use /api/v1/invalidations/{invalidation-id}/errors, which will return the following:
[
    {
        "agentName": "server1",
        "createdAt": "2021-09-24T12:44:57.49496Z",
        "error": "",
        "host": "example.org",
        "id": 2,
        "invalidationId": 1,
        "method": "PURGE",
        "path": "/images/1.png",
        "statusCode": 500,
        "updatedAt": "2021-09-24T12:45:19.803054Z"
    },
    23.999 more items ...
]
These endpoints support filtering and page numbering, like other API endpoints. To filter errors on domain, use /api/v1/invalidations/{invalidation-id}/errors?host=example.org, and to number pages, use /api/v1/invalidations/{invalidation-id}/errors?take=20,0.
CLI commands are also available. To list all errors grouped, use vcli inv errors {invalidation-id}, and to list all errors, add the verbose flag vcli inv errors -v {invalidation-id}.
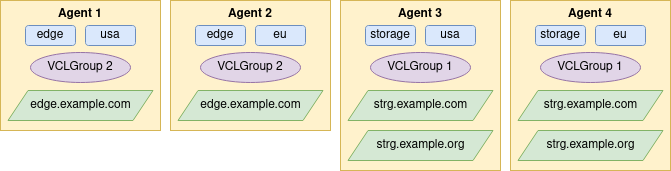
Considering the above setup, here are some scenarios for setting up invalidation requests. With each scenario, the user must have access to the domains, tags, and VCLGroup where the invalidation is requested. If not, there will be an authorization error. Note that it’s possible to combine tags and domains only, just VCLGroups and tags, and more.
Using the tags, you can invalidate all agents within the EU region by sending only the eu tag with the invalidation request. This approach can be used with all tags the user has access to. This will run invalidations on Agent 2 and Agent 4, in no specific order:
{
    "method": "PURGE",
    "paths": ["/images/1.png", "/images/2.png"],
    "tags": [[{"name": "eu"}]]
}
Using a tag list in the API, you can define the order of tags to invalidate. If you want to invalidate all agents with the storage tag, after those invalidations succeed, you can invalidate the edge tag in the eu region. In this scenario, if there’s an error when invalidating the storage agents, it will stop the invalidation and won’t affect the edge agents. Here we give two tag lists; first, Varnish Controller will run invalidations on Agent 4 and after those succeed, it will run invalidations on Agent 2:
{
    "method": "PURGE",
    "paths": ["/images/1.png", "/images/2.png"],
    "tags": [[{"name": "storage"}, {"name": "eu"}], [{"name": "edge"}, {"name": "eu"}]]
}
This request will invalidate agents with the tag eu; (Agent 2 and Agent 4), along with additional headers, which can be read in your VCL:
{
    "method": "PURGE",
    "paths": ["/images/1.png", "/images/2.png"],
    "headers": {"X-Custom-Header": "custom-value"},
    "tags": [[{"name": "eu"}]]
}
Using just a domain, you can invalidate agents that have that domain deployed. To do this, the domain must exist in the Varnish Controller. In this example, we’ll use the domain edge.example.com, so the invalidation request will only invalidate Agent 1 and Agent 2:
{
    "method": "PURGE",
    "paths": ["/images/1.png", "/images/2.png"],
    "domains": [{"fqdn": "edge.example.com"}]
}
With root deployments the domains don’t exist in Varnish Controller, so a VCLGroup is required.
Invalidating within VCLGroup 1 with the domain strg.example.org will invalidate Agent 3 and Agent 4, but invalidation requests are sent only for the domain strg.example.org:
{
    "method": "PURGE",
    "paths": ["/images/1.png", "/images/2.png"],
    "vclGroup": {"id":1},
    "domains": [{"fqdn": "strg.example.org"}]
}
This invalidates VCLGroup 1 with the domain strg.example.org and the tag eu. This will invalidate only Agent 4 and invalidation requests are only sent for domain strg.example.org:
{
    "method": "PURGE",
    "paths": ["/images/1.png", "/images/2.png"],
    "vclGroup": {"id":1},
    "tags": [[{"name": "eu"}]],
    "domains": [{"fqdn": "strg.example.org"}]
}
To invalidate a non-root VCLGroup, you can use the tag VCLGroup 1 with ID 1. This request will invalidate Agent 3 and Agent 4. Varnish Controller will retrieve any domains configured for this VCLGroup; in this case, it will add the domains strg.example.com and strg.example.org to the invalidation request:
{
    "method": "PURGE",
    "paths": ["/images/1.png", "/images/2.png"],
    "vclGroup": {"id":1}
}
This example is not present in Figure 1, but it’s good to know. If you have a root deployment and want to invalidate that VCLGroup, Varnish Controller supports sending in domains that don’t exist in Varnish Controller. At least one domain is required. In the following example, there is a root VCLGroup with ID 3 , which invalidates all agents with this VCLGroup deployed. The agents will send invalidation requests to all domains with paths configured to Varnish on that agent:
{
    "method": "PURGE",
    "paths": ["/images/1.png", "/images/2.png"],
    "vclGroup": {"id":3},
    "domains": [
        {"fqdn": "example.eu"},
        {"fqdn": "example.info"}
    ]
}
With root deployments, a domain still needs to be set as a host header with the HTTP request. The domain doesn’t need to exist in Varnish Controller, but it needs to be set to the domain you wish to invalidate for by using fqdn. You’ll also need to specify the VCLGroup:
{
    "method": "PURGE",
    "paths": ["/images/1.png", "/images/2.png"],
    "vclGroup": {"id":3},
    "domains": [
        {"fqdn": "example.eu"},
        {"fqdn": "example.info"}
    ]
}
With invalidations, you can set up the VCL to allow for banning over HTTP. The reason vcl_backend_response is set in the VCL is explained here.
The difference between vcli command ban and vcli inv is that the former runs the ban command through varnishadm on the Varnish instance and is only available for sys admins, not for organization accounts. The latter runs HTTP requests from the agent to the Varnish instance and an organization account is allowed to use this command. Some basic ACL is performed, so invalidations are only sent to the resources the organization’s account has access to.
Here’s a ban request using the example code from the tutorial above:
vcli inv new -m BAN -p / -t name=example -H x-invalidate-pattern=^/example/[0-9]+\.html -d fqdn=example.org
The actual ban pattern is sent in a header that is read in the VCL. The path is set to /, as we need at least one path for the HTTP request to be run on the agent. For each path, an HTTP request is sent from the agent to Varnish. The method is currently set to BAN, but you can change it to something else as long as it corresponds with the method used in the VCL.
The user is responsible for adding configurations to their VCL to manage purge and ban requests and to perform ACL, according to use case and needs. Varnish Controller can only perform basic ACL on the logged-in user that is using the UI, CLI, or API, and only sends invalidation requests to resources the user has access to.
If an agent is untagged, the previously deployed VCLGroups is kept. If there’s an invalidation request that monitors agents, it might stay in the monitoring state until the execution TTL is reached. Then the invalidation will fail, as it took too long, and there are still old caches on that Varnish instance of the previously deployed VCLGroup. This means that the invalidation was not 100% successful.
When removing a domain from a VCLGroup, Varnish Controller doesn’t know that the Varnish instance has previously served that domain. Therefore, an invalidation request sent for a removed domain won’t invalidate that Varnish instance. Varnish Controller only keeps track of history based on the VCLGroup ID.
The basic invalidation feature provides a quick and simple way to issue invalidations. However, we strongly recommend using the regular invalidation feature in most cases. The regular feature offers powerful configuration options based on VCLGroups, tags, and domains, and it also allows for monitoring.
The basic invalidation feature is exclusively available to system administrators. Its primary purpose is to facilitate API integration, enabling straightforward purging with a fast response time. Requests can be issued either directly via the API or through the CLI. See below:
curl -H "Authorization: bearer $AT" \
     https://<host>:<port>/api/v1/invalidations/basic \
     -d '{
           "domain": "example.com",
           "path": "/png",
           "retries": 0,
           "broadcast": true,
           "method": "purge",
           "attemptTTL": 3000000000
         }'
vcli inv basic -m PURGE -d example.com -p /png --attempt-ttl 3s --retries 3 --broadcast
When broadcast is enabled, the invalidation request is sent to all instances, and the response from each instance is considered when determining if the invalidation succeeded or failed. For the invalidation to be considered successful, all requests must return a status of 200, in case they have the VCLGroup with the assoicated domain deployed.
When broadcast is disabled, the invalidation request is sent only to agents where a VCLGroup is deployed with the associated domain configured.
The API-GW processes the invalidation request and is responsible for spawning subrequests for each agent. The API-GW will retry the subrequests according to the configured number of retries.
The attempt TTL defines the timeout for each request(or retry). Note that there is no waiting time between retries, if the agent or varnish responds with a failure directly the next retry will start its processing.