 Search
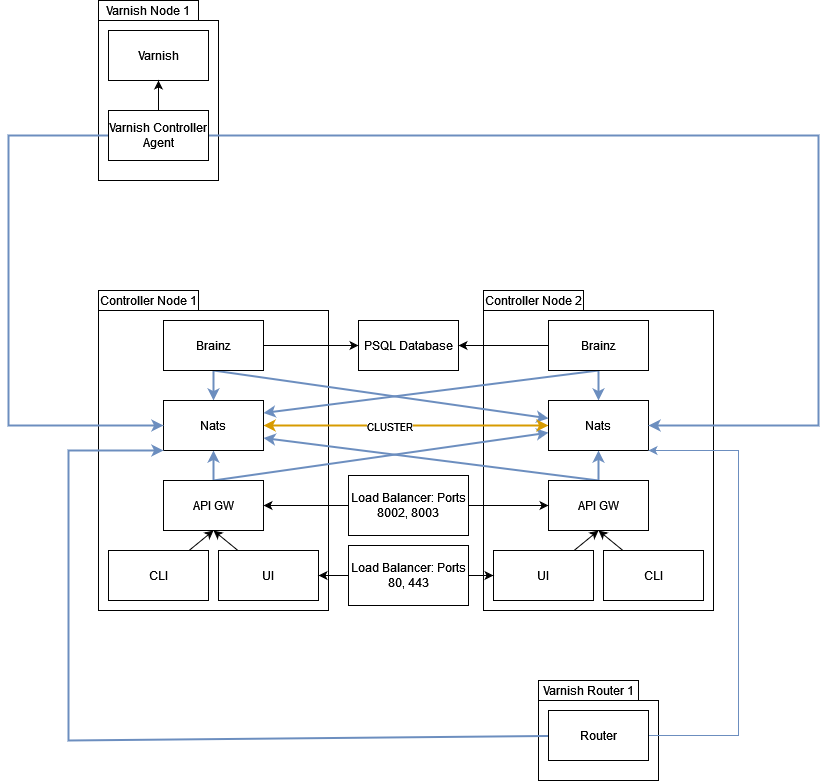
NATS is the message-bus used for communication between the Agent, Brainz, and API-GW. NATS can and should be clustered since it is a vital part of the Varnish Controller setup. To secure communication over NATS, TLS can be used.
# Ubuntu/Debian
sudo apt install varnish-controller-nats

# RPM-based
sudo dnf install varnish-controller-nats
Varnish Controller NATS package comes with a configuration file for NATS. The default message size is increased to support
larger file uploads. This can be configured in /etc/varnish/nats.conf.
max_payload: 104857600
max_pending: 104857600

NATS can be clustered with multiple servers. In a clustered setup, at least two servers are required as an argument to each client. If there are more NATS servers will be spread to the clients by NATS itself. That means that it’s always enough to give two servers as an argument to clients.
To activate NATS clustering the NATS servers need to know about each other.
Example:
# Port 4222 is the port clients connect to. The same port can be used
# if the NATS servers are located on different hosts.
# -cluster specifies the host:port that other servers will use to join the cluster.
# host1:
nats-server -p 4222 -cluster nats://0.0.0.0:4248

# -routes specifies the another NATS servers cluster URL which is the URL this
# nats-server connects in order to join the cluster.
# host2:
nats-server -p 4222 -cluster nats://0.0.0.0:4248 -routes nats://host1:4248

# For each other server added to the cluster, it's setup in the same manner.
# Note that the `routes` could point to either Host1 or Host2.
# It will join the same cluster and still get information about the other
# server over the NATS gossip protocol.
# host3:
nats-server -p 4222 -cluster nats://0.0.0.0:4248 -routes nats://host2:4248
Clients can use this cluster to connect to (giving at least 2 servers):
# <name> is either 'brainz', 'agent' or 'api-gw'
varnish-controller-<name> -nats-server host1:4222,host2:4222
Configuration for the first server, nats1.conf:
max_payload: 104857600
max_pending: 104857600

# Local listening host:port, used by the clients
listen: localhost:4222

cluster {
  # Name of the cluster, must be the same in all configuration files.
  name: test
  # This is the cluster "routing" host:port for this NATS instance.
  listen: localhost:5222

  # Authentication for the cluster route
  authorization {
    user: test
    password: test
  }

  # Configured routes in the cluster (in this example we have 2)
  routes = [
    nats-route://test:test@localhost:5222
    nats-route://test:test@localhost:5223
  ]
}
Configuration for the second server, nats2.conf:
max_payload: 104857600
max_pending: 104857600

listen: localhost:4223

cluster {
  name: test
  listen: localhost:5223

  authorization {
    user: test
    password: test
  }

   routes = [
     nats-route://test:test@localhost:5222
     nats-route://test:test@localhost:5223
   ]
}
The NATS servers can then be started like this:
nats-server -c nats1.conf
nats-server -c nats2.conf
Detailed clustering information can be found here.
NATS can be configured with a port for monitoring. Specifying -m <port> to the nats-server will open a port that can be accessed
in order to get various message-bus related information.
Detailed monitoring information can be found here.
The NATS server can be started with TLS certificates and authentication with user, password, and token, such as:
nats-server --tls --tlscert server-crt.pem --tlskey server-key.pem --user test --pass test --token mytoken
It can also be configured (preferred) in nats.conf (default /etc/varnish/nats.conf).
Example configuration for having TLS between nats-servers and clients:
port: 4221
tls {
  cert_file: "/path/to/client-cert.pem"
  key_file:  "/path/to/client-key.pem"
  # CA File required if self-signed certificates are used
  ca_file: "/path/to/ca.pem"
  verify_and_map: false
}

# Cluster configuration
cluster {
  port: 5221
  tls {
    cert_file: "/path/to/client-cert.pem"
    key_file:  "/path/to/client-key.pem"
    ca_file: "/path/to/ca.pem"
    verify: true
  }
  routes = [
    # The other nats-server
    nats-route://localhost:5222
  ]
}
Detailed TLS information including how to create self-signed certs can be found here.
If NATS is running with TLS the Varnish Controller processes must also be configured with TLS for NATS.
All the Varnish Controller binaries have the same arguments with regard to NATS TLS:
user:pass@host:port.Example:
varnish-controller-<name> -nats-server user:pass@192.168.1.2:5222,user:pass@192.168.1.3:5222 -nats-token mysecrettoken -nats-client-key server.key -nats-client-cert server.crt
Note that these parameters can be set in a configuration file or as environment variables.